126 Barrows, 10:00-11:50am Mondays and Wednesdays. You'll be informed if circumstances require a remote class, in which case we'll use maine.zoom.us/my/jonippolito.
Instructor: Jon Ippolito, 581-4477, jonippolito.net.
Office hours: The instructor's office hours are Mondays and Wednesdays 1:20-2pm in the lobby of Neville or via Zoom (see links in Slack #reference channel); please sign up in advance via the instructor's Google Calendar.
This class requires a laptop new enough to run AirPlay or equivalent. ⚠️ You will find it difficult but not impossible to develop for iPhone without a Mac.
This course requires a recent iPhone (most compatible) or Android smartphone (also works) capable of running apps.
You will need this software on your laptop and phone.
Generative AI has become an important tool in a professional programmer’s toolkit, but studies indicate it only helps if you already know what you’re doing. For that reason, you are only allowed in this class to use AI in the following contexts:
When you do use AI, please cite the model and how you used it ("I used Claude Sonnet to help me draft an outline and also to check spelling in grammar before submitting my final draft").
😅 Nervous about all this? Don't worry, this class will show you how to use AI responsibly so we welcome any questions you have!
40% builds completed (as Snacks or CLI), 20% creative effort, 20% badges, 10% tickets/participation, and 10% quizzes.
0 or below = F (failing), 1 = D (poor), 2-4 = C (satisfactory), 5-7 = B (good), 8-10 = A (outstanding). You can watch a 2-minute video on the Ten-Point Grading System.
-
-
Brainstorm a movie plot that wouldn't have worked if the characters had mobile phones.
The conventional approach (7 languages) versus React Native (3 languages).
You should already have an account on a web host.
We will only use this for a couple of assignments. You can use the same account from NMD 345.
Watch the video if you need an introduction to this courseware.
Make sure you've installed the Expo Go client on your iPhone or Android phone.
Make sure you have the mobile version of Slack on your phone as well.
Make sure you can access your web host (eg, DreamHost or Bluehost) and know how to post files to it.
Toggling mobile view in your browser
Container versus item.
/* Normal layout for big screens. */
.puffins-home-page {
	display: grid ;
	grid-template:
	  "title	title	title	logo"   20vh
	  ".		.		.		logo"	5vh
	  "description		.		blurb	blurb"  50vh
	  "about	about	blurb	blurb"	20vh
	  / 4fr		1fr		6fr		3fr
	;
}
Add this viewport tag in your HTML to tell your browser your device width. This will let you check responsiveness using the little "phone" icon in your browser's Web Inspector.
<head>
	<meta name="viewport" content="width=device-width, initial-scale=1.0">
</head>
✅ In the <head>, use device-width.
❌ In a media query, don't use device-width, which is deprecated because it gives misleading results for high-resolution displays. ("Retina display" crams more than one device pixel into each CSS pixel on the screen, which is confusing 😕)
✅ In a media query, use width with a comparison like < or <= .
Common breakpoints:
@media (width < 768px) { /* 📱 Phone-specific styles */
	.big-image {
		width: 500px ;
	}
}

@media (768px <= width <= 1024px) { /* 📋 Tablet-specific styles */
	.big-image {
		width: 1000px ;
	}
}

@media (1024px < width) { /* 🖥️ Desktop-specific styles */
	.big-image {
		width: 1500px ;
	}
}
Sample media query for phones (note outer and inner braces):
/* Normal layout for big screens. */
.puffins-home-page {
	display: grid ;
	grid-template:
	  "title	title	title	logo"   20vh
	  ".		.		.		logo"	5vh
	  "description		.		blurb	blurb"  50vh
	  "about	about	blurb	blurb"	20vh
	  / 4fr		1fr		6fr		3fr
	;
}
/*  Special layout for phones.
    Note outer and inner braces. */
@media(  width <= 768px  ) {
    body {
        grid-template:
            "logo	title"
            "menu	menu"
            "blurb	blurb"
            "about	about"
            / 2fr	3fr
            ;
    }
    p {
        font-size: 1.4em ;
    }
    #my-title {
        font-size: 1.7em ;
    }
    #my-menu {
        font-size: 1em ;
    }
    #my-blurb {
        font-size: .8em ;
    }
}
🎩 For maximum responsiveness, use rems instead of px.
Follow the section of this script called "Step-by-step walkthrough".
Use CSS Grid to create a web page with Codepen that adapts to large and small devices. Follow these steps as explained in this week's viewing and resources to make your additional content disappear or move to a better position when you shrink the screen.
You'll want to add @media queries in your CSS to switch between styles depending on screen size. For a mobile device, your @media queries could, for example, hide a search bar or increase the font sizes. (You may assume 414 x 896 pixels is the maximum size for your mobile device, or refer to the longer list of breakpoints in the reading.)
Make sure your design adjusts appropriately by dragging CodePen's preview pane to narrow the viewport width. Then post your URL to #responsive-grid.
🎩 Outside of CodePen, the best way to test responsiveness is toggling the phone icon in your browser's web inspector/dev tools.
Template strings, arrow functions, and iterators
JavaScript Object Notation for moving data around
Put this bad code into JSONLint.com and revise it until it validates. Note that JSONLint requires double-quotes around keys and values, not single quotes or smart quotes. (You don't need to post this, just show the instructor your validated JSON before you leave.)
Do the intro and sections on .forEach(), .map(), and .filter().
You may have to expand the menu options to see this lesson. You should not be charged any fee; you may need to choose "Sign up" but do not choose "Start free trial."
Do the intro and sections on object literals, accessing properties via dot . and bracket [] notation, and property assignment.
If you don't want to earn this badge, just click the link to watch the video with no quizzes.
JSONPlaceholder - Fake online REST API for developers (Like lorem ipsum for JSON)
Dog API (random photos)
TheCatAPI (random photos)
JavaScript Iterators 1-4 and Objects 1-5, link in #reference
In your final app for this course, you'll pull content created by your users from a database using JSON. Some options include:
To simulate content that could be stored in your database, create a new document containing 5-7 sample records in the JSON format, and save it in your project folder with a .json extension. These records could be examples of albums, recipes, pets--anything that might appear in your app as "cards."
Test the validity of your JSON by pasting it into JS Lint, then post your code as a snippet to #sample-json by dragging your file directly onto the Slack channel.
(For a bit more challenge, find some JSON relevant to your app in a public API, such as the ones listed in the optional reading for this lesson.)
Mock up a parti, rendering, or diagram for a possible final project for this class and post it to #project-approach. Your app should incorporate these features you'll learn in this course:
You app may but need not:
The final version of your project will be graded on how well it functions, how well it is designed for a phone, and how far you have taken it beyond the sample code from this class. Your instructor will evaluate its performance on an iPhone XR unless you tell him otherwise.
Make sure you have VS Code or another code editor installed.
Visual Studio v. Visual Studio Code
This shows you the .then / .catch alternative to the async / await approach.
⚠️ As a rule, external JSON files won't work with CodePen, so you'll need to write this in your own code editor.
⚠️ Some browsers will not allow you to load an external file from your hard drive in a web page (eg, with fetch), so you'll need to upload both to your web host.
😅 Don't worry about styling for now.
Make sure you have Expo Go and Slack Mobile apps installed on your phone.
This cheatsheet offers reminders that can help you overcome pitfalls as you progress through the lessons.
Submit this before class. See link in #reference.
Edit the snack you made in the last class to add 3 or more <Text> components inside your <View> component. Give each a different style using the model shown in the React Native documentation. You can try these attributes:
// Color.
color: "red",
// Font.
fontFamily: serif,
fontSize: 12,
fontStyle: "italic",
fontVariant: "small-caps",
fontWeight: "bold",
// Text alignment.
textAlign: "left"/"center"/"right",
// Underline.
textDecorationColor: "blue",
textDecorationLine: "underline",
textDecorationStyle: "dotted",
// Text shadow.
textShadowColor: "yellow",
textShadowOffset: { width: 10, height: 5 },
textShadowRadius: 4,
// Transforms.
textTransform: "uppercase",
These common CSS color names may be helpful.
Note that you will not be able to change the layout--just the typographic aspects. Check your results, save your Snack, and shake the Expo app on your phone to copy the URL. Use the Slack app on your phone to paste this URL into the Slack #snack-text channel.
ℹ️ Changing the file name of a Snack and saving when you're logged in creates a duplicate for you of the original Snack.
⚠️ Add a version number to your Snacks so you get credit for each one you write for this course, eg Jon's Pet Finder v3.
💇♀️ Click Prettier at bottom to tidy code; only works if your code has no syntax errors.
📂 Open files list versus Project list.
  <View
    style={{
      backgroundColor: 'tomato',
      borderRadius: 10,
    }}
  >
    	<Text style={{ fontSize: 18 }}>🍕 Welcome to Pizza Express</Text>
  </View>
<ScrollView
  style={{
    flex: 1, // Makes the ScrollView take up the full screen height
    backgroundColor: 'paleturquoise', // Sets the background color of the ScrollView itself
  }}
  contentContainerStyle={{
    padding: 20, // Adds padding inside the scrollable content
    alignItems: 'center', // Centers all child items horizontally
  }}
>
  	{/* Scrollable content */}
</ScrollView>
import { StyleSheet, Text, SafeAreaView }
<SafeAreaView style={{ flex: 1 }} >
  <Text>Your content here</Text>
</SafeAreaView>
🤖 Add this fix to support Android too:
import { StyleSheet, Text, SafeAreaView, Platform, StatusBar }
...
const styles = StyleSheet.create({
	container: {
		paddingTop: Platform.OS === "android" ? StatusBar.currentHeight : 0,
		...
	},
	...
}
Use import to add a general-purpose module at the top of your code, such as the Image component.
Use require to add a specific need inline, such as puppy_logo.png.
./ means in the same directory; ../ means up one directory.
The spread operator ... extracts the items from an array or object so you can add more to it.
⚠️ Whether local or networked, you must import the Image component along with any others you are using at the top of your component, eg:
import { Text, View, StyleSheet, ScrollView, Image } from 'react-native';
<Image
	source={require('./puppy_logo.png')}
/>
You don't need to specify dimensions for a local image.
<Image
	source={{uri: 'https://facebook.github.io/react/logo-og.png'}}
    style={{width: 400, height: 400}}
/>
⚠️ You must use style to specify the dimensions of a networked image.
⚠️ Best to use https URLs to satisfy the iOS App Transport Security requirements.
☹️ Unlike HTML, <Text> attributes like color won't be inherited from a parent <View>.
⚠️ Don't forget to import the SafeAreaView at top, and to change the closing <View> tag.
Keep the existing "container" style attribute.
🧐 Notice that the items no longer overlap with the notch or battery indicator.
🧐 Change the height of your browser window and see how the children adjust to fill the screen.
ℹ️ The default flexDirection for React Native is "column".
<View style={{alignSelf: 'flex-start', ...styles.card}}>
  <Text style={styles.cardText}>⬅️ Left</Text>
</View>
⚠️ Note the extra pair of braces {}
Save your Snack and post the URL to #x-zigzag.
⛑ Hints
Edit the snack you've been working on to add and style several <View> components inside your existing Snack. Give each a different style using the model shown in the React Native documentation. You can try these attributes, but note that some work better on iOS or Android:
// Dimensions.
width: 100,
height: 200,
// Position.
display: flex, // Unnecessary because default.
flex: 1, // Use one unit of available space; similar to 1fr.
flexDirection: "row", // Default is "column".
alignItems: "center",
justifyContent: "center",
// Box color.
color: "gray",
backgroundColor: "powderblue",
// Padding.
paddingVertical: 3,
paddingHorizontal: 3,
// Border.
borderWidth: 4,
borderWidthColor: "red",
borderRightWidth: 4,
borderLeftWidth: 4,
borderTopWidth: 4,
borderBottomWidth: 4,
borderRadius: 10,
// Box shadow.
shadowColor: "red",
shadowOffset: "{width:3,height: 3}",
shadowOpacity: 3,
shadowRadius: 4,
This time your goal is to create a first draft of the same layout that you created for your Web app. You do not need to include the responsive code (@media queries), because you are only targeting a phone in this case.
Save your Snack, and paste this URL into the Slack #snack-view channel.
Stop using black and white Sample Sample
Limited palettes with hsl() With HSL
Black + white + 1 accent Sample Sample Sample
Dark gray palette Sample Sample Sample
ℹ️ Resource for icons: The Noun Project
Showing your mobile design in your portfolio
Applying Fitts Law to Mobile Interface Design
"The farther and smaller the target, the harder to land on it."
Have You Been Holding Your Phone Wrong This Whole Time?
Sometimes you want some actions to be easier to trigger, eg Tinder's "swipe right to like."
You'll want to organize your information in a hierarchy of importance, eg:
feed
	|_ card
		|_ card title
		|_ body text
	|_ card
		|_ card title
		|_ body text
	|_ card
		|_ card title
		|_ body text
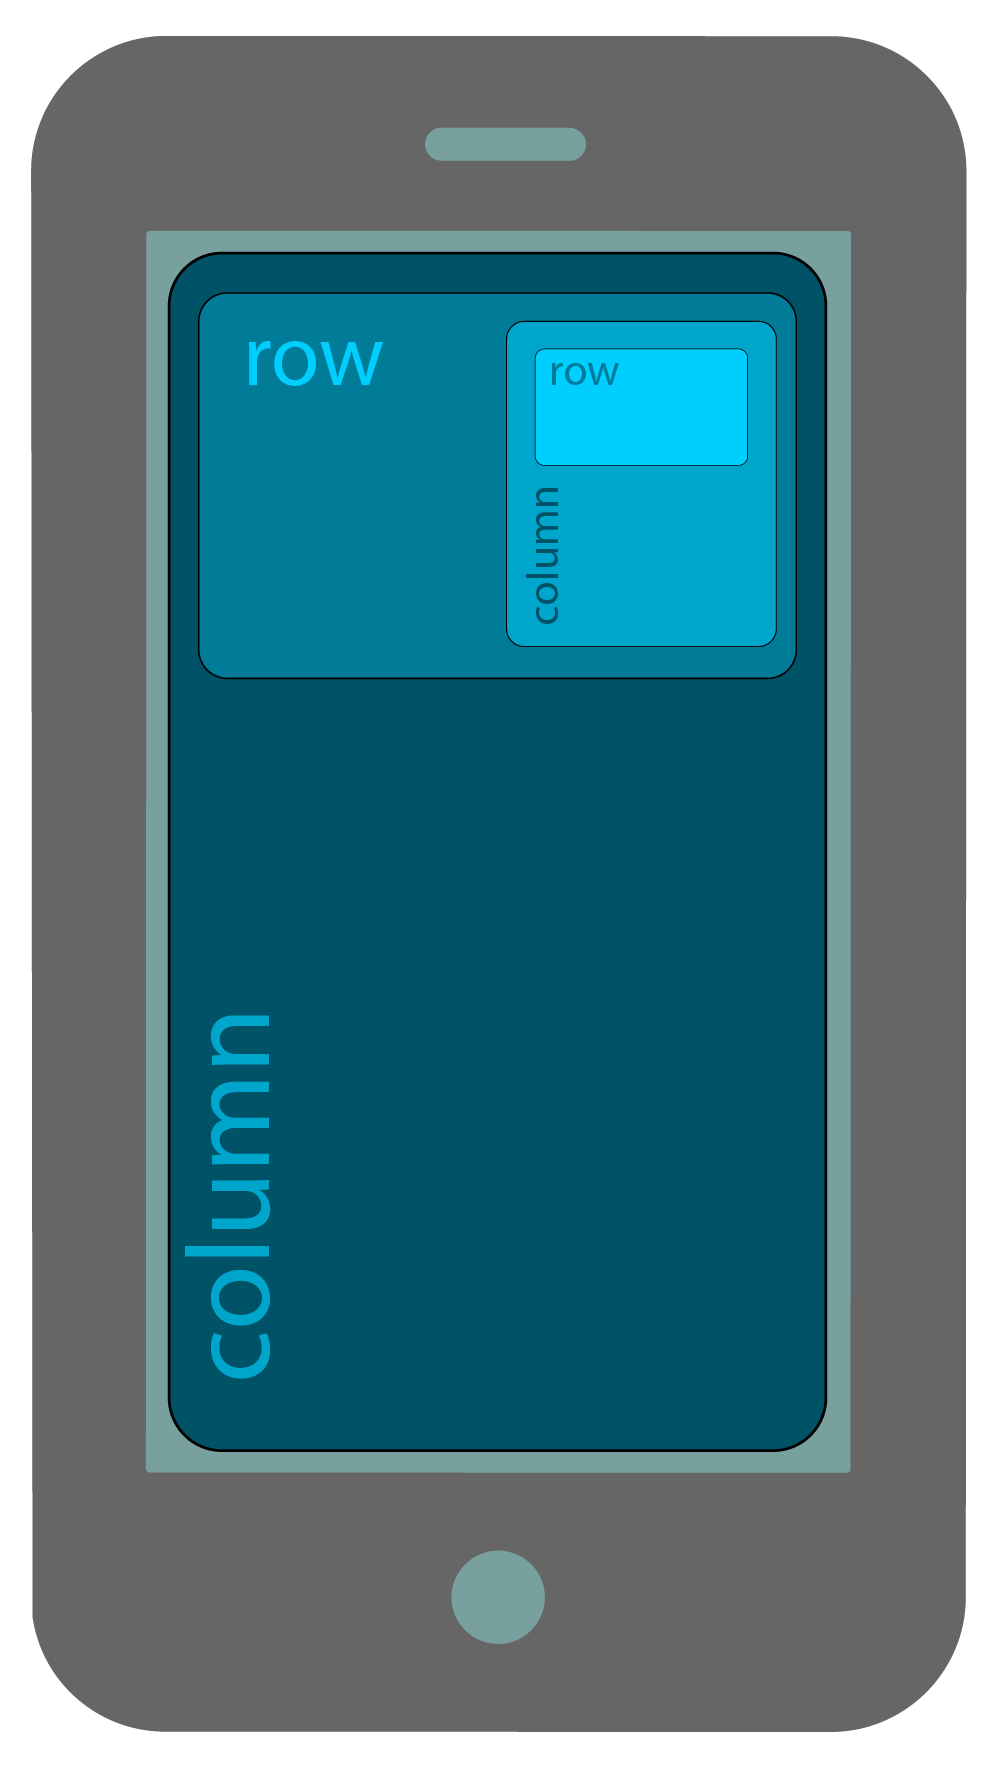
To do this, nest your <View>s with alternating flex directions.
<ScrollView style={{ flexDirection: 'column' }}>
	<View style={{ flexDirection: 'row' }}>
		<Image ... />
		<View style={{ flexDirection: 'column' }}>
			<Text>Card title...</Text>
			<View style={{ flexDirection: 'row' }}>
				<Text>Body text...</Text>
			</View>
		</View>
	</View>
</ScrollView>
Number of View levels visualized: None 1 2 3 4
ℹ️ the React Native default flex direction is column.
FlexBox (display: flex) is the best way to lay out designs in React Native. Complete challenges level 1 through 17 (and beyond if you like). (Later we will use these techniques to enhance your web app wireframes.)
⛑ Hints
(If you've already earned any of these badges, just review the videos.)
Submit this before class. See link in #reference.
Edit the snack you've been working on to create more nuanced cards by alternating the flex direction of nested <View>s as shown in the previous class. (Remember that the React Native default flex-direction is column.)
Change the name so you don't lose your old work, save the Snack, and post the URL to #refine-layout.
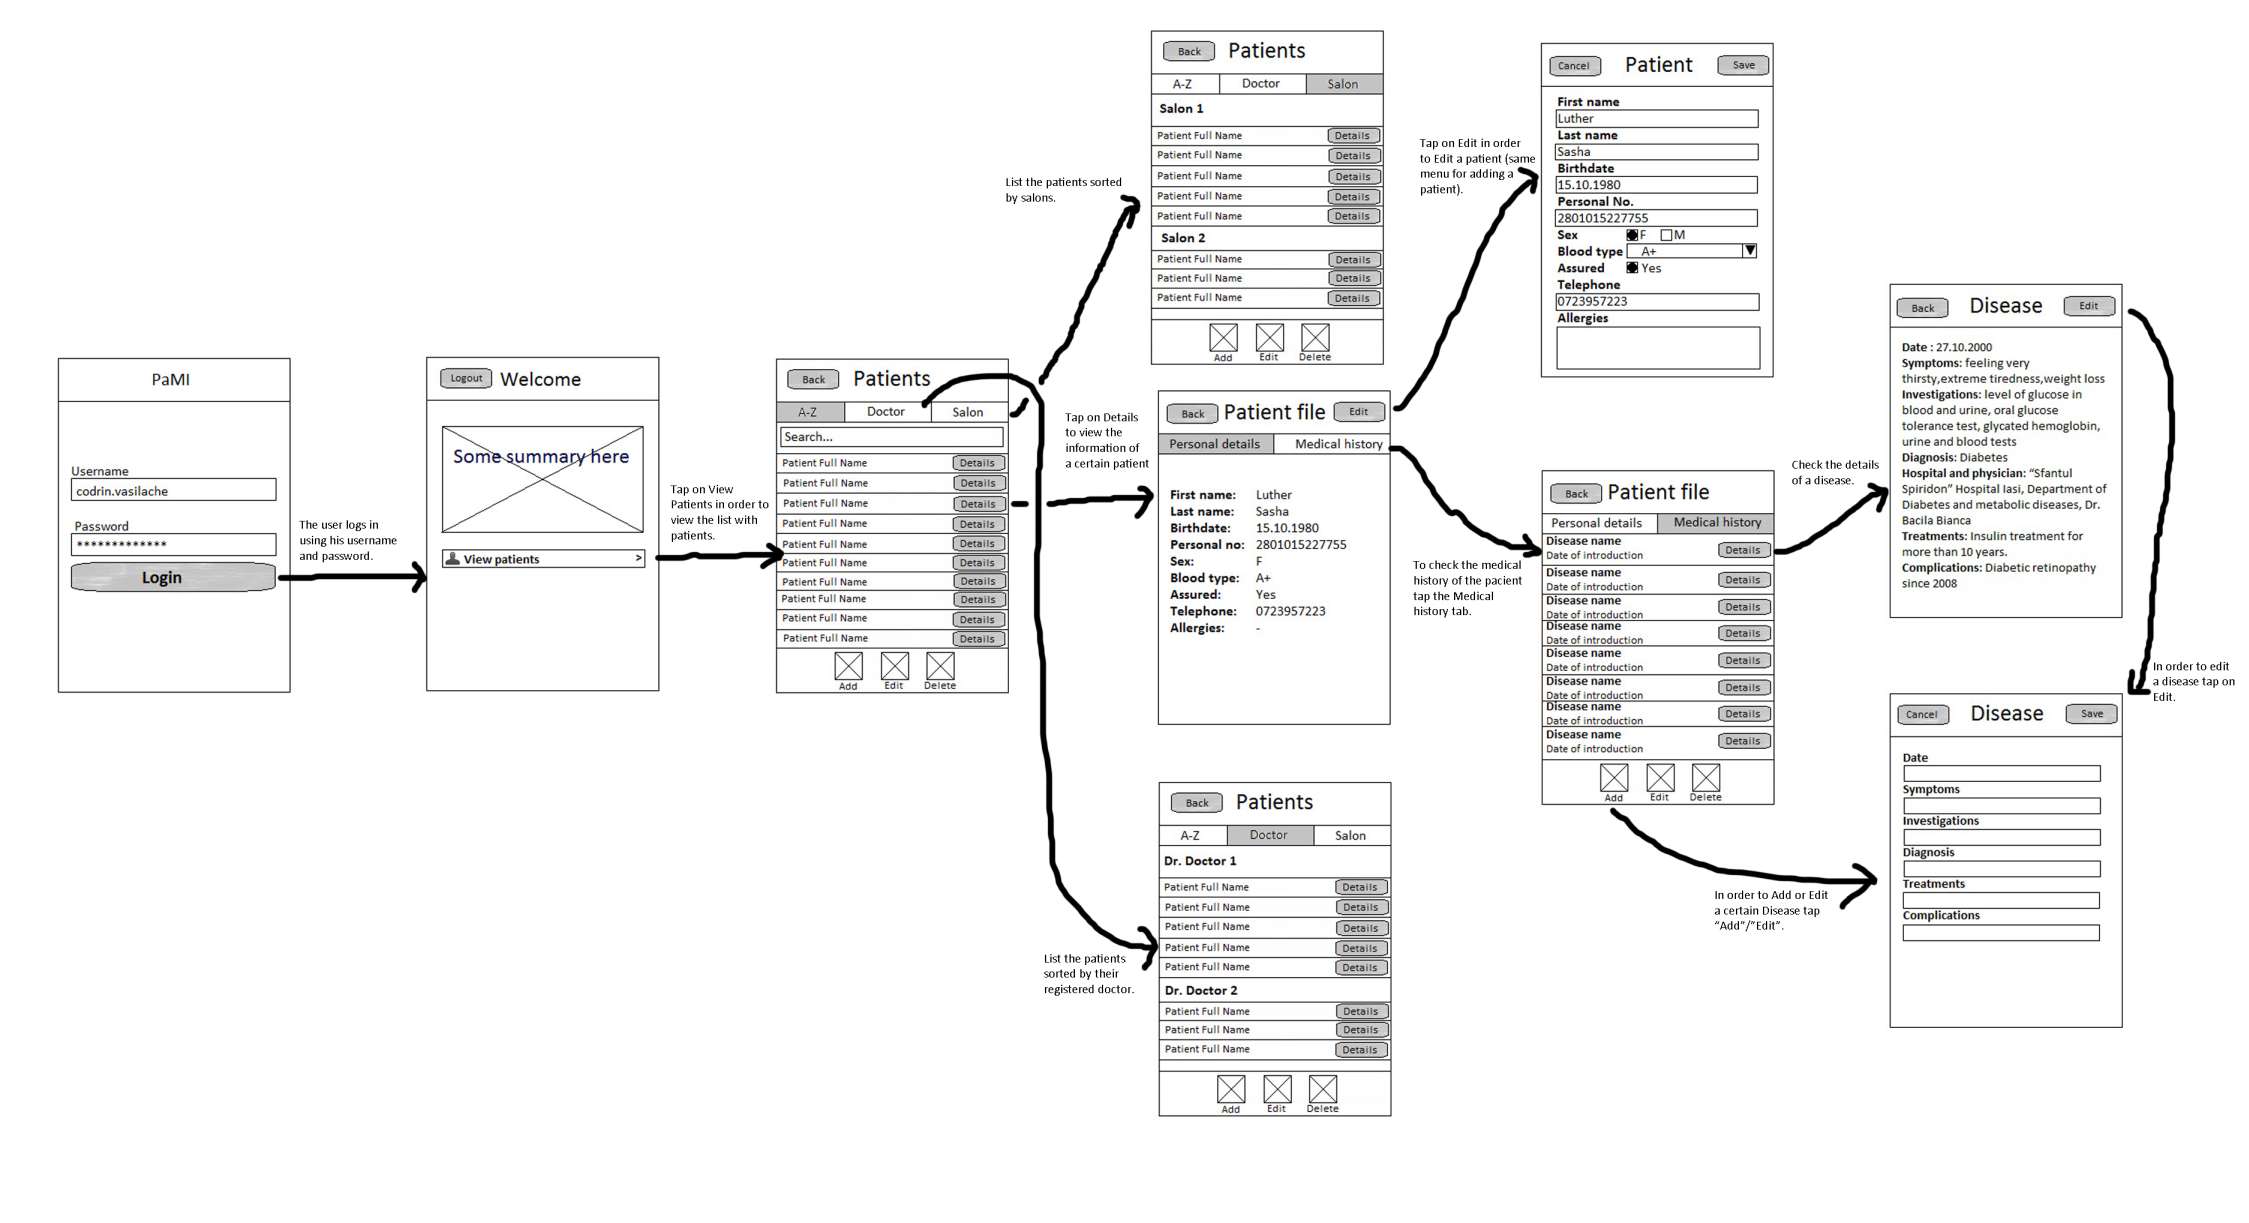
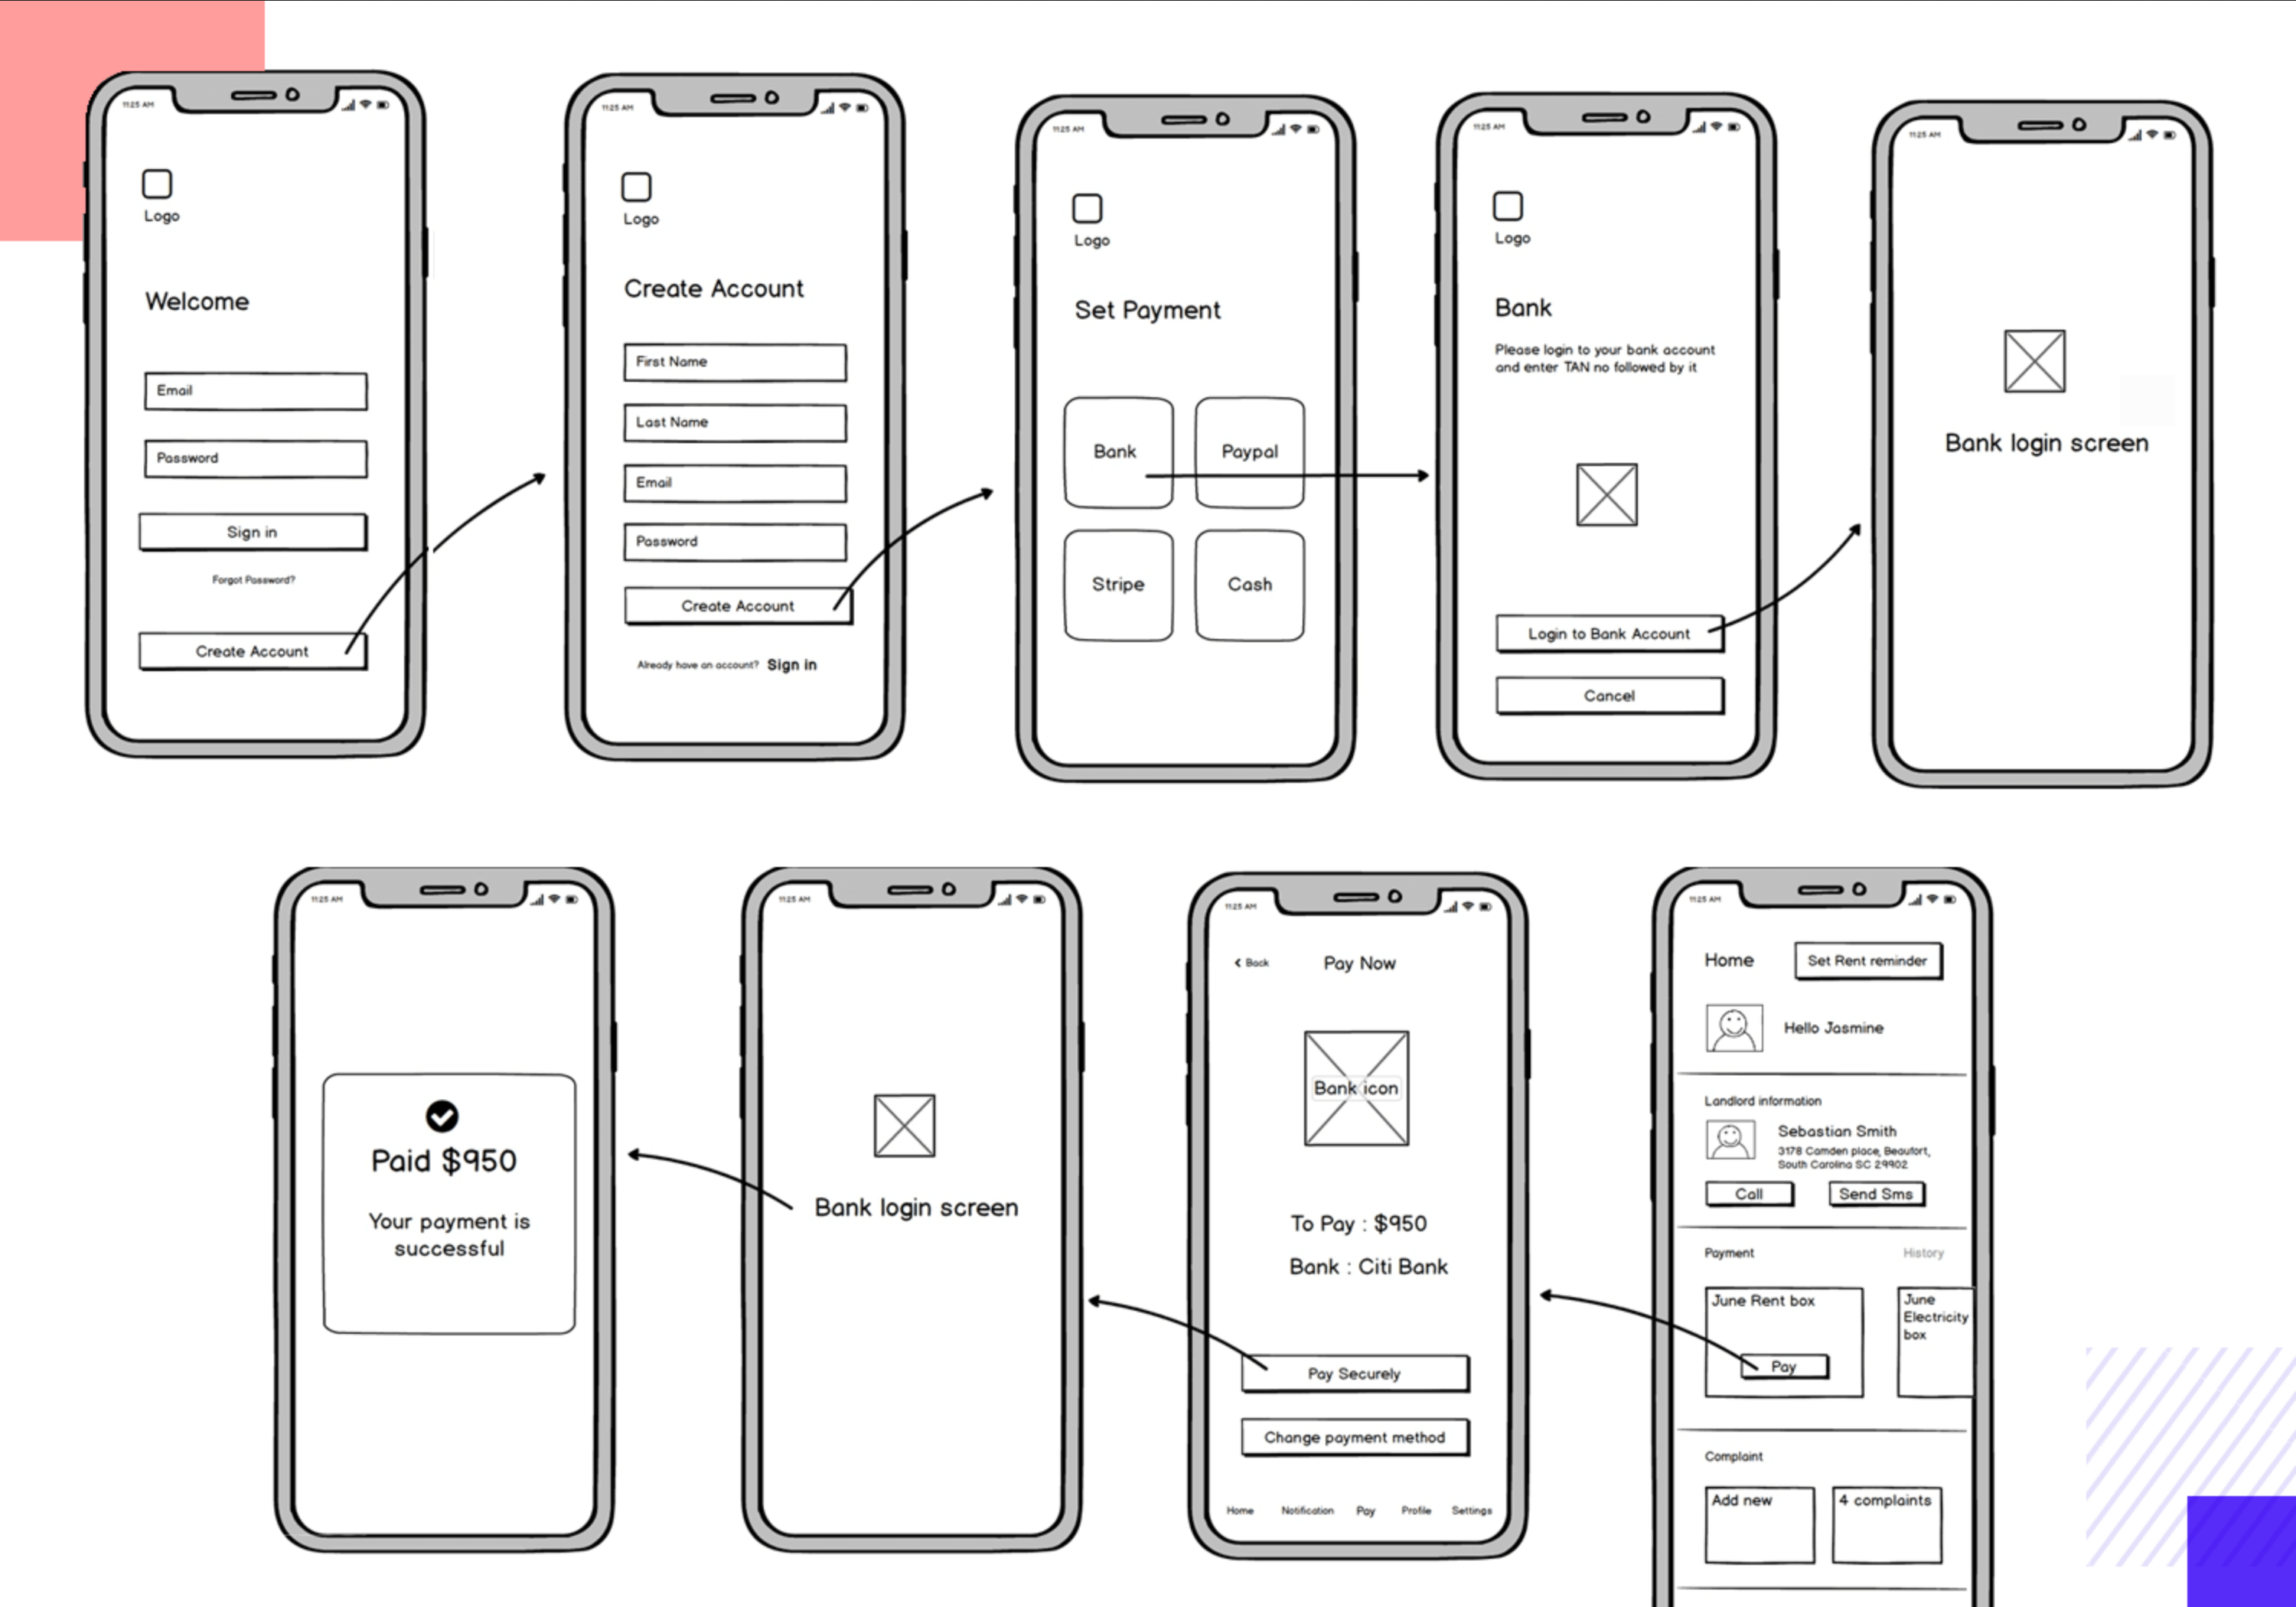
Example of a wireframe before and after components are identified.
ℹ️ More on how mobile UX design differs from web UX (ignore ads)
Join the Zoom whiteboard linked from #reference, and navigate at lower right to the page chosen for you by the instructor. As a group, annotate the wireframe or your page to circle and label each of the re-usable components on each screen. (This process is how you decide which custom components to make for your React Native app.)
Click the Prettier option at bottom frequently while you’re coding your Snack. Some errors, like a missing or extra brace } , are much easier to find if your code is indented properly. But once you have an error, you can’t click Prettier anymore ☹️.
import React from "react";
// OR:
import * as React from 'react';
❌ import ReactNative from "react-native" ; // BAD

✅ import { Text, View, StyleSheet } from "react-native" ; // GOOD
export default function App() {
	...
}
return (
	<View style={styles.container}>
	  <Text style={styles.greeting}>Yo!</Text>
	</View>
);
const styles = StyleSheet.create({
  container: {
    flex: 1,
    alignItems: "stretch",
    justifyContent: "space-around",
    backgroundColor: "goldenrod"
  },
  greeting: {
    fontSize: 80,
    color: "palegoldenrod",
    textAlign: "center"
  }
});
// Import components.
import React from "react";
import { StyleSheet, Text, View } from "react-native";
// Lay out components on the screen.
export default function App() {
  return (
    <View style={styles.container}>
      <Text style={styles.greeting}>Yo!</Text>
    </View>
  );
}
// Define the component styles.
const styles = StyleSheet.create({
  container: {
    flex: 1,
    alignItems: "stretch",
    justifyContent: "space-around",
    backgroundColor: "goldenrod"
  },
  greeting: {
    fontSize: 80,
    color: "palegoldenrod",
    textAlign: "center"
  }
});
🍎 Wrap all components with <SafeAreaView> at the top level to leave room for notch, battery indicator, etc.
🤖 This solution works for both iOS and Android add paddingTop: Platform.OS === "android" ? StatusBar.currentHeight : 0 to your container style. You will need to import Platform and StatusBar at the top.
A <View> can contain <Text>s, <Image>s, custom components, and so forth. However, a <View> won't scroll. For this you can replace it or wrap it in a <ScrollView> component.
🎩 A more advanced version of <ScrollView> called <FlatList> will only load 10 items on the screen and add more only when the user scrolls to reveal them.
container: {
    flex: 1
}
<ScrollView contentContainerStyle = { styles.cards} >
cards: {
	alignItems: "center", // To prevent left justification.
}
<View style = { styles.container } >
	<ScrollView contentContainerStyle = { styles.cards} >
		<View style={styles.card}>
			<Text>{/* First card */}</Text>
		</View>
		<View style={styles.card}>
			<Text>{/* Second card */}</Text>
		</View>
		<View style={styles.card}>
			<Text>{/* Third card */</Text>
		</View>
	</ScrollView>
</View>
...
container: {
    flex: 1
},
cards: {
	alignItems: "center", // To prevent left justification.
	flexGrow: 1, // To fill the vertical space without losing scrollability. Best for ScrollView.
},
card: {
	// Style your records here.
}
const Card = () => {
	return (
	        <Text>Welcome to my app!</Text>
	);
} ;
export default Card ;
// Long-winded alternative syntax.
class Welcome extends React.Component {
  render() {
    return (
		...
	);
  }
}
Back in App.js, import your new Card component at top and add it somewhere in the return statement.
import Card from './components/Card';
...
export default function App() {
	return(
		...
		<Card />
	)
}
⚠️ The instructions only show copying the <Text>, but for this exercise you should copy the <View> that surrounds it as well.
The result should look the similar to the original, but be constructed from two different JavaScript files. Post your URL to #x-outsource-cards.
Identify regions of code in your app--probably <View>s corresponding to individual records--that could be generated by a common template. Based on the technique shown in the tutorial, add to your Snack a Card.js file that defines a <Card> component.
Copy the relevant JSX from App.js into your new Card.js template, along with any associated styles. Then add copies of that <Card> into your App.js file to create more records in your list. Post the URL to #custom-component.
(For now, all the records produced in this way will look the same; we'll customize their properties in your next assignment.)
<ImageBackground source={...} style={{width: '100%', height: '100%'}}>
	<Text>Put foreground here</Text>
</ImageBackground>
<Button
	title="Visit Google!"
	onPress={
		() => Linking.openURL( "https://google.com" )
	}
/>
<TouchableOpacity
	onPress={
		() => Linking.openURL( "https://google.com" )
	}
>
		<Image
			source={ require("google_logo.png") }
		/>
</TouchableOpacity>
Advantages
<Pressable
	onPress={
		() => console.log('Pressed!')
	}
	style={
		({ pressed }) => [
			{
				backgroundColor: pressed ? 'lightgray' : 'white',
			},
			styles.button,
		]
	}
>
  <Text style={styles.text}>Press Me</Text>
</Pressable>
...
const styles = StyleSheet.create({
  button: {
    padding: 10,
    borderRadius: 5,
    borderWidth: 1,
    borderColor: 'black',
  },
  ...
});
ℹ️ Fonts that work on iOS and Android
💇♀️ Always click Prettier before saving or sharing.
⚠️ Export your Snacks to save them periodically.
⚠️ To share a CLI project, zip the project directory only. The helper folders like node-modules are way too heavy.
import InfoButton from "./InfoButton" ;
const Card = () => {
	return (
		<InfoButton
			buttonText = {"Click for more dogs!"}
			whenPressed = {
				() => Linking.openURL( "https://dogs.com" )
			}
		/>
	);
} ;
const InfoButton = ( { buttonText, whenPressed } ) => {
	return(
		<TouchableOpacity
			onPress={ whenPressed }
		>
			<Text>
				{ buttonText }
			</Text>
		</TouchableOpacity>
	);
} ;
Making fonts bigger or more open may cause text to spill outside its container. You can use these parameters to limit its size in each card (say), and then reveal the full text in a detail screen:
<Text numberOfLines={2} ellipsizeMode="tail">:
	This text is too long for the card, but will cut off after two lines.
</Text>
👉 We left these cards as individual <TouchableOpacity> tags because we don't yet know how to make custom components that are each different. But you'll learn that in the next lesson!
Using the technique shown in the tutorial, edit your Card.js file to add a props parameter, and then add variables based on this where appropriate. Then edit your App.js file to pass custom properties to each of the <Card>s in your list. Post the URL for your Snack to #custom-properties.
What syntax needs to change for mobile apps?
import Constants from 'expo-constants';

// You can import from local files
import AssetExample from './components/AssetExample';

// or any pure javascript modules available in npm
import { Card } from 'react-native-paper';
<Card>
	<AssetExample />
</Card>
const addPizza = () => {
   console.log('🍕');
 };
import * as React from 'react';
import React, { useState } from 'react';
const [ food, setFood ] = useState("") ;
const addPizza = () => {
  console.log('🍕');
};
const [food, setFood] = useState("What's for dinner?");
Save your Snack and post the URL to #x-hook.
Compare the Web (HTML) and React Native (JSX) versions of responding to a button. What changes when you move to mobile?
Dig up the JSON you wrote earlier for #sample-json, or write new JSON to match the card fields in your current app. Paste your JSON into JSONlint just to make sure it validates before proceeding to the next step. If you haven't already, upload your JSON to a server and note the URL.
(As an advanced alternative, you can try incorporating JSON from an outside API, such as those listed in Lesson 2.60 above. Be warned that JSON in outside APIs tends to be complex.)
Based on technique in the tutorial, edit your App.js Snack file to add useEffect and useState hooks. Then fetch your JSON URL and map each of the resulting objects to return the custom component you created for the previous assignment. Post a video of your app, captured from your phone or the desktop simulator, to #records-from-data.
Follow the instructions in the transcript for this week's badge to import your JSON into your Snack; you will not need the useEffect and useState hooks for now. Post the resulting Snack URL to #records-from-data.
You may find yourself staring down this error:
❗️Element type is invalid: expected a string (for built-in components)
 or a class/function (for composite components) but got: undefined.
or its “minified” equivalent:
❗️Minified error #130
These are usually import/export errors involving components (or screens, which are also components). Solution:
export default function App() {
	...
};
const MyComponent = (props) => {
	...
};
export default MyComponent;
import {MyComponent} from "./MyComponent"; ❌

import MyComponent from "./MyComponent"; ✅
import MyComponent from "../components/MyComponent";
❗️Students must rename their Snacks for each channel or when one breaks the teacher can't give credit for previous ones with the same URL.
👍 Changing the file name of a P5js Sketch doesn't duplicate the Sketch; you have to log in as your name and Save to do that. Changing the file name and saving a Snack, however, creates a duplicate of the original Snack at a different URL.
⚠️ Just zip the project directory, not your entire React Native directory. (Each node_modules directory alone can be up to 1GB!)
Also known as "dark patterns"
Submit this before class. See link in #reference.
Create a second screen for your app and add a button to your first screen to take users to the second, posting the results to #navigate-screens.
You can still use the technique shown in the tutorial, with these adjustments:
import { NavigationContainer } from '@react-navigation/native';
import { createStackNavigator } from '@react-navigation/stack';
Here's a simple demo of screen navigation in a Snack. ⚠️ The Web preview may not work; load this demo on your phone instead.
The URL for this minified error (https://reactjs.org/docs/error-decoder.html/?invariant=301...) leads to an error page that says:
Too many re-renders
This error means React is stopping you from creating an infinite loop by re-rendering a condition over and over.
🛠 Change a state variable from being always true to being conditionally true, eg from this:
const [ isLoggedIn, setIsLoggedIn ] = useState(false) ; // This sets an initial state.
// This is always true and will re-render the screen endlessly.
setIsLoggedIn( true ); ❌
to this:
const [ isLoggedIn, setIsLoggedIn ] = useState(false) ; // This sets an initial state.
// This only re-renders once the user has logged in.
if ( password === "girlboss" ) { setIsLoggedIn( true ) } ; ✅
🎗 Remember that string values get "" while other values get {}.
<Button
    title="Click to log in"
    onPress={ setIsLoggedIn }
/>
🎗 useState hook creates a variable and a "setter" to go with it:
const [text, setText] = useState( "Initial text );
Getting what the user typed into <TextInput>; can be a pain, because it doesn't know its own value.
Solution:
<TextInput
	onChangeText={ text => setState( {text} ) }
	value={text}
/>
This is a Controlled Component: by binding the input's value to state, it will always be accessible and you'll never have to pull it out manually later.
❌ Methods passed to a child component don't get parentheses
✅ Functions that render code inside JSX do get parentheses.
Omit () to prevent the function from firing as soon as the tags are displayed on screen.
// You don't want this function to run when the app returns the JSX.
const showMessages = () => {
	Alert.alert( "Sorry, no messages bro!" ) ;
}
...
return <Button onClick={ showMessages } />
Alternatively, you can delay showMessages from running by wrapping it in an anonymous function.
// This function won't fire until you click on the button.
return <Button onClick={ () => showMessages() } />
If you're mapping out tags, you probably do want that function to run along with the other tags.
// You do want the cards to show when the app loads, so include ().
const renderCards = () => {
	return pets.map( <Card...> )
}
<ScrollView>
	{ renderCards() } ;
</ScrollView>
❌ if conditional inside the return statement
✅ if conditional outside the return statements
✅ "Ternary" ? conditional inside the return statement
This message means you've returned two "sibling" tags instead of a parent to contain them. This error will be at the highest level of one of your return statements.
Adjacent JSX elements must be wrapped in an enclosing tag
Solutions:
⚠️ Watch out for siblings hiding in the syntax of a ternary conditional. Only tags count, so isLoggedIn below is not a true parent.
// This will fail ❌
{ !isLoggedIn?
	(
		<Button onPress={ login } />
	) : (
		<Text> Welcome to My Pet Finder app</Text>
		<Button onPress={ seePets } />
	)
}
// This will succeed ✅
{ !isLoggedIn?
	(
		<Button onPress={ login } />
	) : (
		<View>
			<Text> Welcome to My Pet Finder app</Text>
			<Button onPress={ seePets } />
		</View>
	)
}
Follow the numbered instructions in the simple login exercise to create an app whose screen changes once the button is pressed to allow the user to type in a field. Post the URL to #x-simple-login-form.
Based on the technique shown in the tutorial, add several new React Native components to your app to build a login form. Integrate this into your initial screen and style it to your liking. The form should allow users to enter their email and password but not do any actual authentication--that is, their credentials are not compared to a database record or otherwise verified. Once users complete the form, they should be able to access the actual content of your app--but not before. Post the resulting Snack URL or zipped Expo CLI code to #conditional-login.
Constructor requires new...
This error usually means you didn't import a needed component, custom or default.return statements.
Solution:
⛑ When posting to #troubleshooting, please paste the error, as text or a screenshot, from the console rather than the red screen at right. Don't just post the Snack URL!
⛑ Remember the hints to each Codecademy lesson next to the Codecademy links in the syllabus.
⛑ Also remember the React Native bug squasher.
⛑ Snack command palette.
Start from the final state of the Navigate among Screens demo created in the last class.
 <Button
    onPress={
      () => navigation.navigate(
        'SecondScreen',
                {
                  animal: "ferrets"
                }
      )
    }
    title="Learn about ferrets"
  />
const animal = screen.route.params.animal ;
This screen is about {animal}!
Your final Snack should behave like this.
😁 Note that the second screen is the same but looks different depending on the button pressed.
Complete survey in #reference
Find the JSON you wrote for the Records from Data assignment, and add more fields to offer more details about each record. For example, you might augment JSON that simply listed pet names and images with each pet's age, breed, and description.
Then follow the technique shown in the How to customize a detail screen tutorial to build a detail screen. Clicking on a record in the records screen should bring users to this screen that shows more detailed about the record chosen. You should build this screen as a generic React Native component to which you pass parameters from the previous screen that will identify the details to display. Post the resulting Snack URL or zipped Expo CLI code to #customize-screen.
☹️ Problem: the user can't type in your input form because the keyboard slides up and covers it.
🛠 Solution: KeyboardAvoidingView
Vote with 👍 emoji in #x-most-popular-language
JavaScript v. other languagesIn App.js, add:
import { NavigationContainer } from '@react-navigation/native';
import { createNativeStackNavigator } from '@react-navigation/native-stack';
...
export default function App() {
	const Stack = createStackNavigator();
	return (
		<NavigationContainer>
			<Stack.Navigator>
				 <Stack.Screen name="WelcomeScreen" component={WelcomeScreen} />
				 <Stack.Screen name="HomeScreen" component={HomeScreen} />
				...
Then in your (tabbed) Home screen, you can add:
import { createBottomTabNavigator } from '@react-navigation/bottom-tabs';
const HomeScreen = () => {
	const Tab = createBottomTabNavigator();
	return (
		<Tab.Navigator>
			<Tab.Screen name="Profile" component={ShelfScreen} />
			<Tab.Screen name="Settings" component={GoalsScreen} />
	 	 ...
⚠️ There is only one <NavigationContainer>, and it should go in the App.js file.
⚠️ The "Stack, Tabs, Drawer, Authentication" video in today's reading is useful but has some differences from our approach:
The instructor will review your work in #customize-screen.
Post screenshots and/or videos of the current state of your app, and a paragraph introducing your app as well as a list of eventual features as bullet points in #good-bad-ugly. Example:
My app helps people who have lost or found a missing pet.
Users who lose a pet can:
- Add descriptive information including color, breed, size.
- Add a photo from their phone's photo reel.
- Add contact information including owner, address, email, and phone number.
- Add the geolocation of its last whereabouts.
- See the locations of all lost and found pets on a map.
- Get notifications of sightings that resemble their pet.
- Check their pet off the list once it has been found.
Users who find a stray pet can add:
- Add descriptive information including color, breed, size.
- Add a photo from their phone's camera.
- Add contact information including email and phone number.
- Send a private message to the owner via the app.
- The geolocation where the animal was seen.
- Get a notification when the pet was returned to its owner.
Invariant Violation: Text strings must be rendered within a <Text> componentt
const Card = () => {
	return(
		<View>
			This text is in the wrong place. ❌
		</View>
	);
}
const Card = () => {
	return(
		<View>
			<Text>
				This text is in the right place. ✅
			</Text>
		</View>
	);
}
const Card = () => {
	return(
		<View>
			<Text>
				There shouldn't be a semicolon on the next line 😟
			</Text>
		</View>; ❌
	)
}
const Card = () => {
	return(
		<View>
			<Text>
				A semicolon at the end of a return statement is fine 😁
			</Text>
		</View>
	); ✅
}
const Card = () => {
	return(
		<View>
			// A JavaScript comment inside JSX will fail ❌
		</View>; ❌
	)
}
const Card = () => {
	return(
		<View>
			{ /*
				Comments here will not throw an error
				or affect the code in any way.
			*/ }
		</View>
	)
}
// ❌ This will give an error due to adjacent siblings.
return (
  <View>
    <Text>You can see me 🐵</Text>
  </View>

  { /*
  <View>
    <Text>You can't see me 🙈</Text>
  </View>
  */ }
);
Minified React error #152: nothing returned from render
or just
[ Nothing on the screen 😮 ]
const Card = () => {
	<View>
		<Text>
			This isn't going to show up on my app ☹️
		<Text>
	<View>
}
Solution:
const Card = () => {
	return(
		<View>
			<Text>
				This will show up on my app 😅
			<Text>
		<View>
	);
}
import { Text, SafeAreaView, StyleSheet } from 'react-native';
❌ import {KittenScreen} from './screens/KittenScreen';
✅ import KittenScreen from './screens/KittenScreen';
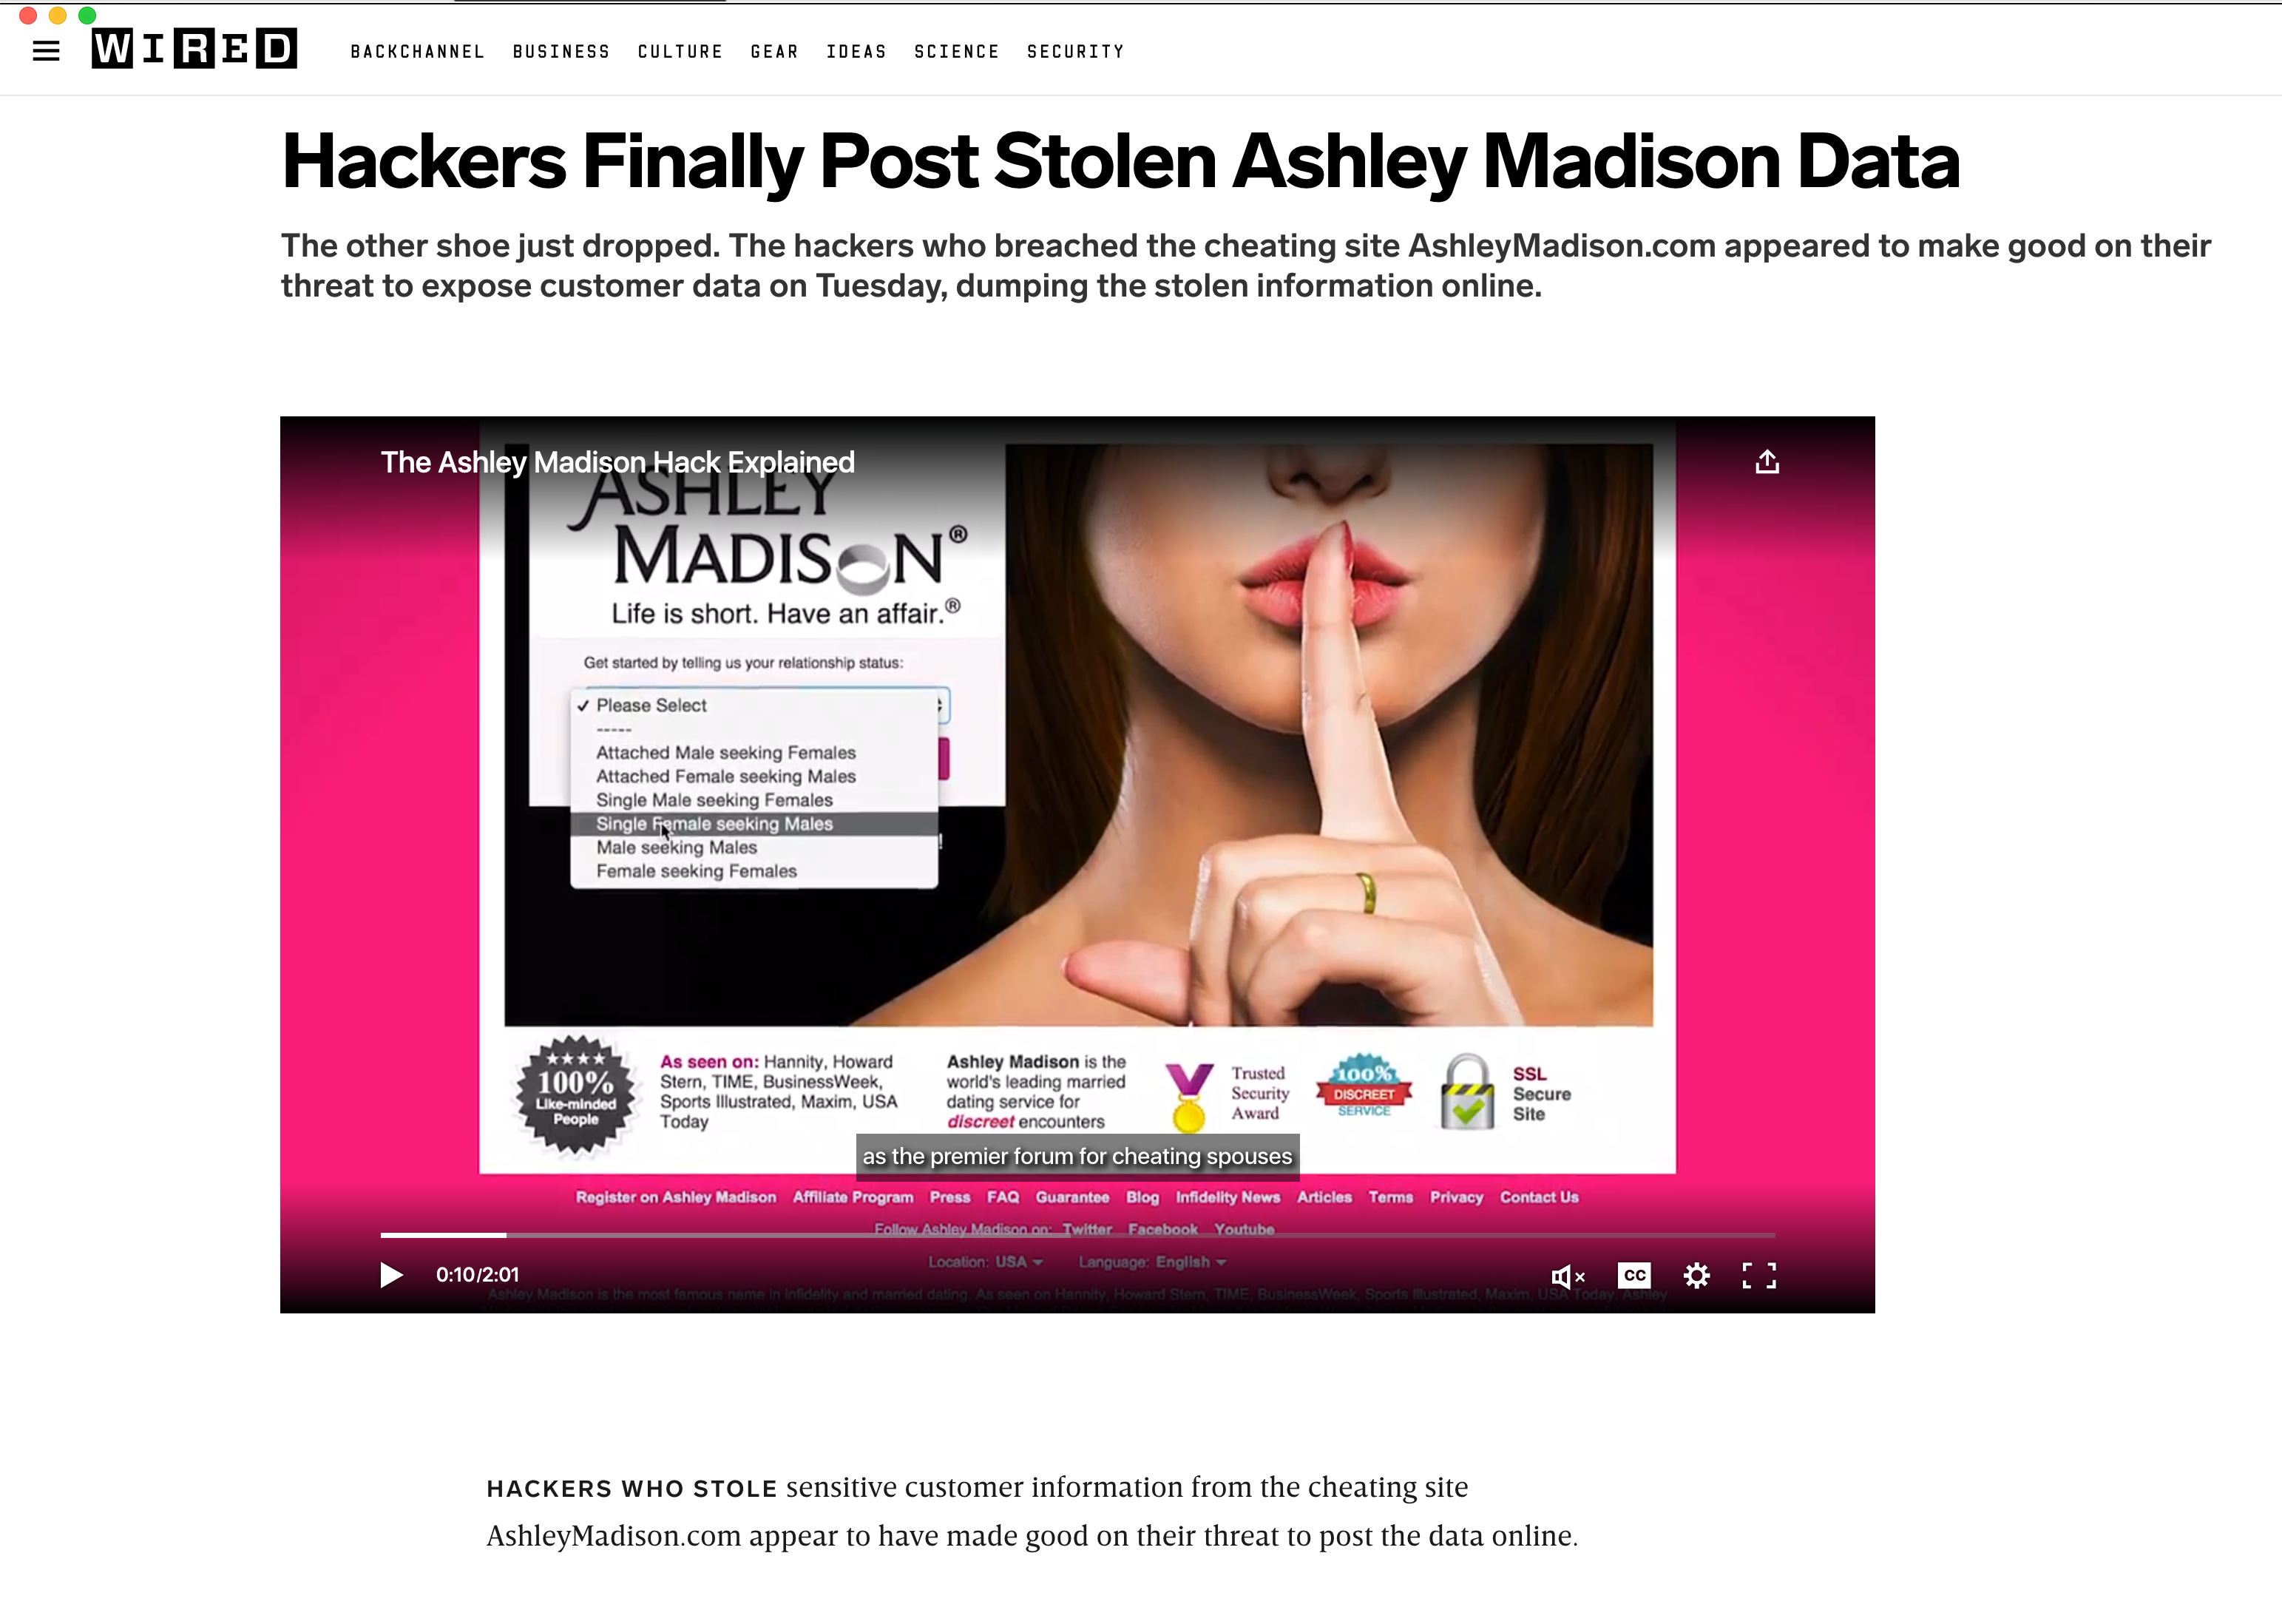
Hack of Ashley Madison exposed affairs of thousands of people. Link
Cambridge Analytica secretly repurposed personal data from an app called "This Is Your Digital Life" for opposition political research.
Myspace was the largest social networking site in the world from 2005 to 2008; more people visited it than Google. In 2019 MySpace botched a server migration of 50 million songs and 12 years of music, losing all user content from 2015 and earlier, with no backup.
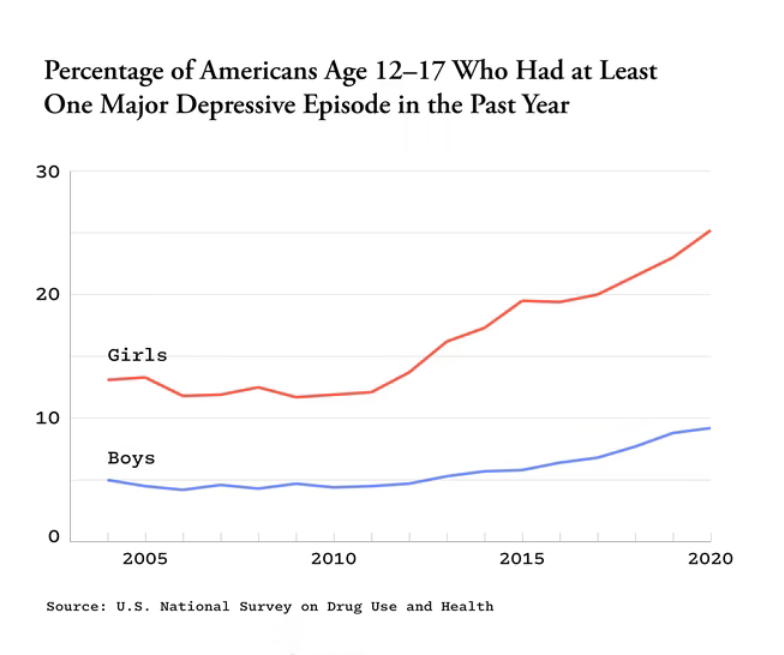
📈Teen mental health after the iPhone
🍿 Tristan Harris: "Nancy is focused"
🍿 Tristan Harris on infinite scroll
The simple game Flappy Bird was so addicting that its creator pulled it from the App Store after receiving death threats, while many are concerned about toddlers growing up as the "iPad Generation."
Think of a time of day when you want to filter out certain distractions (whether personal or school-related). In groups separated according to Android and iPhone users, test Focus/do not Disturb mode for your phone according to these instructions. (Note that your options may be slightly different depending on your phone and operating system version.)
You will need to follow the first half on creating a Firebase account for this lesson, and the second half on creating a login for the following lesson. As an alternative to using the Firebase Web app configuration shown in this tutorial, you can follow these instructions on using "iOS" or "Android" app configuration.
In the same #good-bad-ugly channel, for the classmate whose last name follows yours alphabetically, add a threaded comment including 1) any criticism of its visual design, with special emphasis on Fitts Law, and 2) a description of at least one scenario in which the app could harm society or the environment, eg:
You may also contribute any innovative ideas for how the app could be promoted so it isn't ignored.
Follow the instructions in the "How to Login to the Cloud" video or script to create a Firebase account and copy your configuration key-value pairs.
package.json Failed to resolve dependency 'firebase@*'
Solution:
{
  "dependencies": {
    "firebase": "*",
    ...
  }
}
{
  "dependencies": {
    "firebase": "8.0.0",
    ...
  }
}
if ( !firebase.apps.length ) firebase.initializeApp( firebaseConfiguration ) ;
"I can't click on the #@% button because the keyboard's in the way!"
Solution:
const WelcomeScreen = () => {
  ...
  return (
    <View style={styles.welcomeContainer}>
      ...
    </View>
  );
};
import { ... KeyboardAvoidingView, Platform } from 'react-native';
...
const WelcomeScreen = () => {
  ...
  return (
    <KeyboardAvoidingView behavior={Platform.OS === 'ios' ? 'padding' : 'height'} style={styles.welcomeContainer}>
      ...
    </KeyboardAvoidingView>
  );
};
If you can’t find an error in your Snack, the problem may be in your Firebase configuration (which others can’t see because it’s your private database). Check to make sure you chose:
Your final Snack should look like this. When you're done, students can scan the QR codes to sign into each other's apps, and visit Authentication > Users to see the new accounts.
⚠️ You will need a phone, doesn't always work on the web preview.
⚠️ Alerts won't show up in the Web preview, but console logs will.
⚠️ Email addresses are not case sensitive, but passwords are.
🐞❌ If you get a browser page that says "We are sorry, but you do not have access to Google Developers. Please contact your Organization Administrator for access." Switch to Chrome for this part, log out of your maine.edu account, and log into any other Gmail account (could be one you make just for this class).
🐞❌ If you get a Snack error that says "Failed to resolve dependency 'firebase@*", click on the error or package.json at left, then revert the firebase version from "*" to "8.0.0"
Save your URL and post to #x-login-demo
-
Following the instructions shown in the Log into the Cloud tutorial, use your Firebase account to set up authentication with email and password. Then add the ability to log in or register a new account to your Snack, and stop the process if authentication fails. Post your Snack URL or Expo CLI code/movie to #login-to-cloud.
Three customers: returning customer, new customer, and thief.
Three employees in charge of: existing accounts, new accounts, and security.
.then()
.catch()
import { ... KeyboardAvoidingView, Platform } from 'react-native';
...
const WelcomeScreen = () => {
  ...
  return (
    <KeyboardAvoidingView behavior={Platform.OS === 'ios' ? 'padding' : 'height'} style={styles.welcomeContainer}>
      ...
    </KeyboardAvoidingView>
  );
};
Duplicate the Firebase authentication demo you made in the last class (teacher's copy) and follow these steps to add feedback while loading.
Try logging in to test whether the loading message appears. 🎩 If your connection is too fast to see the message, open your browser's dev tools and set Throttling to 2G.
Now let's make it a bit fancier.
🎩 Add a similar conditional to show different content when isLoggedIn is true.
Save your new URL and post to #x-spinner.
-
-
-
Using the technique shown in the tutorial, add a Spinner component to your app to let the user know when the app is waiting for data from the cloud. Save your Snack and post the URL to #feedback-while-loading.
firebase.database().ref('pets').once would only get records once
firebase.database().ref('pets').on allows real-time updates when combined with setState.
snapshot.val() is an array with all the objects (key/value pairs) from the '/pets' path.
Follow these steps to test adding data to your database.
https://my-paintings.firebaseio.com/
	|_ paintings
		|_ painting1
			|_ paintingTitle:  Self-portrait
https://my-paintings.firebaseio.com/
	|_ paintings
		|_ painting1
			|_ paintingTitle:  Self-portrait
			|_ medium: oil on canvas
			|_ price:  100
		|_ painting2
			|_ paintingTitle:  My Backyard
			|_ medium: watercolor
			|_ price:  200
⚠️ Don't forget the ! in the conditional initializeApp statement.
⚠️ Make sure the variable defining your Firebase login (eg, const firebaseConfiguration) is the same as the argument to your initializeApp command.
import { useState } from 'react';
const [ fruitName, setFruitName ] = useState( "" );
<TextInput
	placeholder="Fruit"
	value={ fruitName }
	onChangeText={
		( fruitName ) => setFruitName( fruitName )
	}
/>
<TextInput
	placeholder="Fruit"
	value={ fruitName }
	onChangeText={
		( fruitName ) => setFruitName( fruitName )
	}
	style={styles.input}
/>
...
const styles = StyleSheet.create({
  ...
  input: {
    backgroundColor: 'white',
    paddingBottom: 10,
    marginBottom: 10
  }
});
<Button title="Add it!" onPress={ addFruit } />
const addFruit = () => {
    firebase.database().ref("fruits").push(
      {
        fruitName
      }
    )
    .then(
      data => {
        //Success
        console.log ("Fruit Added!");
      }
    )
    .catch(
      error => {
        //failure
        console.log(`There was a problem adding your fruit: ${error}`);
      }
    )
}
⚠️ Enclose a message in backticks ` if you want to include a variable like ${error}.
Now test it and check to see if your entry was added to the database! When it is, post a screenshot of the expanded Firebase tree to #x-add-fruit.
The goal of this assignment will be to re-create some of the records you wrote out earlier in JSON, this time by typing those fields into your app one record at a time and uploading them.
Following the process shown in the tutorial, add a feature to your app for adding records to your Firebase database. Post the Snack URL to #add-record.
🎩 If you want to test your app with dummy data, an easy way is to copy the data from the .json file you made earlier somewhere you can find on your phone (eg, paste Grumpy Cat and https://en.wikipedia.org/wiki/Grumpy_Cat into the Notes app on your iPhone). Then just paste those values into your phone's Add Record screen, and then check Firebase to see if they were added.
Load your classmate's Snack on your phone, and test adding a record to their cloud.
⚠️ Tutorial uses deprecated React Native Picker component for Android drop-down or iOS tumbler
<Picker
	selectedValue={ fruit }
	onValueChange={
		( itemValue, itemIndex ) => setFruit( itemValue )
	}
>
	<Picker.Item label="Apples" value="apples" />
	<Picker.Item label="Bananas" value="bananas" />
	<Picker.Item label="Cherries" value="cherries" />
</Picker>
✅ Instead use a community picker library
A node tree in Firebase's database that is equivalent to JSON but has weird ids.
A branch of the NoSQL tree you've chosen to download to your app.
Returned by Firebase's .on listener (analogous to HTML's onload)
Identifies a node in your NoSQL tree (analogous to HTML's 'querySelector or getElementById).
Standard JSON format, but without a variable assigned.
You can get it with snapshot.toJSON().
Set your state variable to this so you can see when it changes.
This makes it easy to add cards to your app.
Get it by manually pushing each JSON object into a custom array you make for this purpose.
🎗 Make sure to double-quote the keys and values.
⚠️ If you use the "canned" JSON file you previously added to your Snack, you must remove the variable definition. Standard JSON must be an array of objects separated by commas.
🛠 If you can't get Firebase to recognize your JSON, try running it through JSONformatter as well.
[
	{
	   "fruitName": "Apple",
	   "fruitImage": "https://my-fruit-finder.com/apple.png",
	   "fruitLink": "https://en.wikipedia.org/wiki/Apple"
	},
	{
	   "fruitName": "Banana",
	   "fruitImage": "https://my-fruit-finder.com/banana.png",
	   "fruitLink": "https://en.wikipedia.org/wiki/Banana"
	},
	{
	   "fruitName": "Mango",
	   "fruitImage": "https://my-fruit-finder.com/mango.png",
	   "fruitLink": "https://en.wikipedia.org/wiki/Mango"
	},
	{
	   "fruitName": "Kiwi",
	   "fruitImage": "https://my-fruit-finder.com/kiwi.png",
	   "fruitLink": "https://en.wikipedia.org/wiki/Kiwi"
	}
]
For now, type fruits for the key and placeholder for the value, with the type set to string (ABC).
👏 You've just simulated the process by which your app will load new records to the cloud. Now we can retrieve and display them in our app!
Now that we have sample JSON in our Firebase database, we'll deliver it as an array to our app and show the records on the screen.
import React, { useState, useEffect } from "react";
⚠️ Don't forget the ! in the conditional initializeApp statement.
⚠️ Make sure the variable defining your Firebase login (eg, const firebaseConfiguration) is the same as the argument to your initializeApp command.
const [fruits, setFruits] = useState([]);
🎩 This is the React equivalent of the .then Promise syntax we've seen in normal JavaScript.
🎩 You could change .on to .once if you don't need it to react to new records pushed to the database.
⚠️ The useEffect is not in a separate function but just inside App.js.
⚠️ Adding the empty dependency array [] as a second parameter for useEffect tells React Native to render the screen only once.
  useEffect(() => {
    firebase
      .database()
      .ref("fruits")
      .on("value", (snapshot) => {
        setFruits( snapshot.toJSON() );
      });
  }, []);
⚠️ This step is necessary because you can't use array methods like .map with the weird JSON format used by Firebase.
const fruitObjects = [];
for (var fruitId in fruits) {
	// Add if you want to confirm the data downloaded correctly.
    console.log(fruitId);
	fruitObjects.push( fruits[fruitId] );
}
⚠️ Substitute a property from your own JSON for fruitName.
 const renderFruits = () => {
    return fruitObjects.map(
	  fruit => (
      		<Text>{fruit.fruitName}</Text>
      )
    );
  };
  return (
    <View style={styles.container}>
       { renderFruits() }
    </View>
  );
Post the URL of your completed Snack, which should show a simple list of (say) names for each record, to #x-grab-json.
Using the method shown in class, get the data from your cloud to populate records on your phone after you've logged in. To make it easier for others to contribute (and work around a React Native bug), you will remove the authentication code. Otherwise you'll make some small modifications to the same code (eg, Card components) as for the previous JSON-Based Snack assignment. Post your Snack URL or CLI video to #get-records.
By April 17th, post both of these to #final-project:
There may come a point when your login stops working without an error. If you add logs to the login process, you may find that Firebase is silently rejecting your login even though it worked before!
🛠 Improve your security rules
	{
	  "rules": {
	    ".read": "now < 1683000000000",  // 2023-5-2
	    ".write": "now < 1683000000000",  // 2023-5-2
	  }
	}
	{
	"rules": {
	".read": "auth.uid != null",
	".write": "auth.uid != null"
	}
	}
	{
	  "rules": {
	    "some_path": {
	      "$uid": {
	        ".read": true,
	        // or ".read": "auth.uid !== null" for only authenticated users
	        ".write": "auth.uid === $uid"
	      }
	    }
	  }
	}
There are many more options for improving security, which you can read about in the Firebase documentation or this article.
👆 Use Chrome to check navigation (pair activity)
🛠 Add an outline to clarify what is focused
/* Improve keyboard navigation */
a:focus, button:focus, input:focus {
	outline: 2px solid red;
}
🛠 Add alt tags to images
<img src="umaine.png" alt="A photograph of college students in class" />
🛠 Use semantic tags instead of divs
🛠 Add ARIA roles to non-semantic tags
<div role="navigation">
      <ul role="menu">
        <li role="menuitem">Service 1</li>
        <li role="menuitem">Service 2</li>
        <li role="menuitem">Service 3</li>
	</ul>
</nav>
🛠 Hide ornamentation
<li>Home</li> <span aria-hidden="true">|</span> <li>About us</li> <span aria-hidden="true">|</span><li>Contact</li>
AA standard for value contrast:
👆 Firefox > Inspect > Accessibility
🛠 Increase font-size
body {
 	font-size: 18px;
}
🛠 Use ems or rems rather than px
🛠 Add a text shadow or background highlight
h1, h2, h3, h4, h5, h6, p {
	text-shadow: black 0 0 .2em;
}
// Or
h1, h2, h3, h4, h5, h6, p {
	background-color: hsl( 0, 100%, 100%, .5);
}
Post your screenshot to #x-accessibility
.-
-
Example: Cannot read property 'petName' of undefined
🛠 Check the button that navigates to your detail screen
<Button onPress={ () => navigation.navigate(
	"Pets",
	{
		petName,
		petBreed,
		petAge
	}
) }>
This is necessary even if you are using the streamlined useNavigation() hook, but only when the next screen depends on data from the first.
Visit ChatGPT and run the following prompts.
Acting as an expert in React Native, you will help me debug a problem I'm having with my mobile app. The error I am receiving is _________________. Wait until I paste/upload my code and then help me understand and fix the problem. In your explanation, use a minimum of boilerplate to help beginners understand the code without having to learn anything not absolutely necessary to answer the question.
Assume I am creating the app as an Expo Snack rather than via the command line. For example, if I need to add a dependency, I will not use npm but instead just import it directly into the code. To check my app, assume I'll use the Expo Go app on my physical phone rather than using an emulator.
Also assume I am trying to keep my code as clean as possible, so any screens or smaller components should be in separate files, eg a `Card` component should be in Card.js. Also assume I am writing every component except for App.js as a "functional component," that is with arrow syntax rather than the `export default function ...` syntax.
Paste ChatGPT's code for one of the screens in a Snack and post a screenshot of the results (from your phone or web preview) to #x-ai-generated-screen.
-
-
Refine your app, along with any design or feature enhancements beyond the model app shown in the tutorials, and post it to #final-app.
"Bridge to the Future" exercises
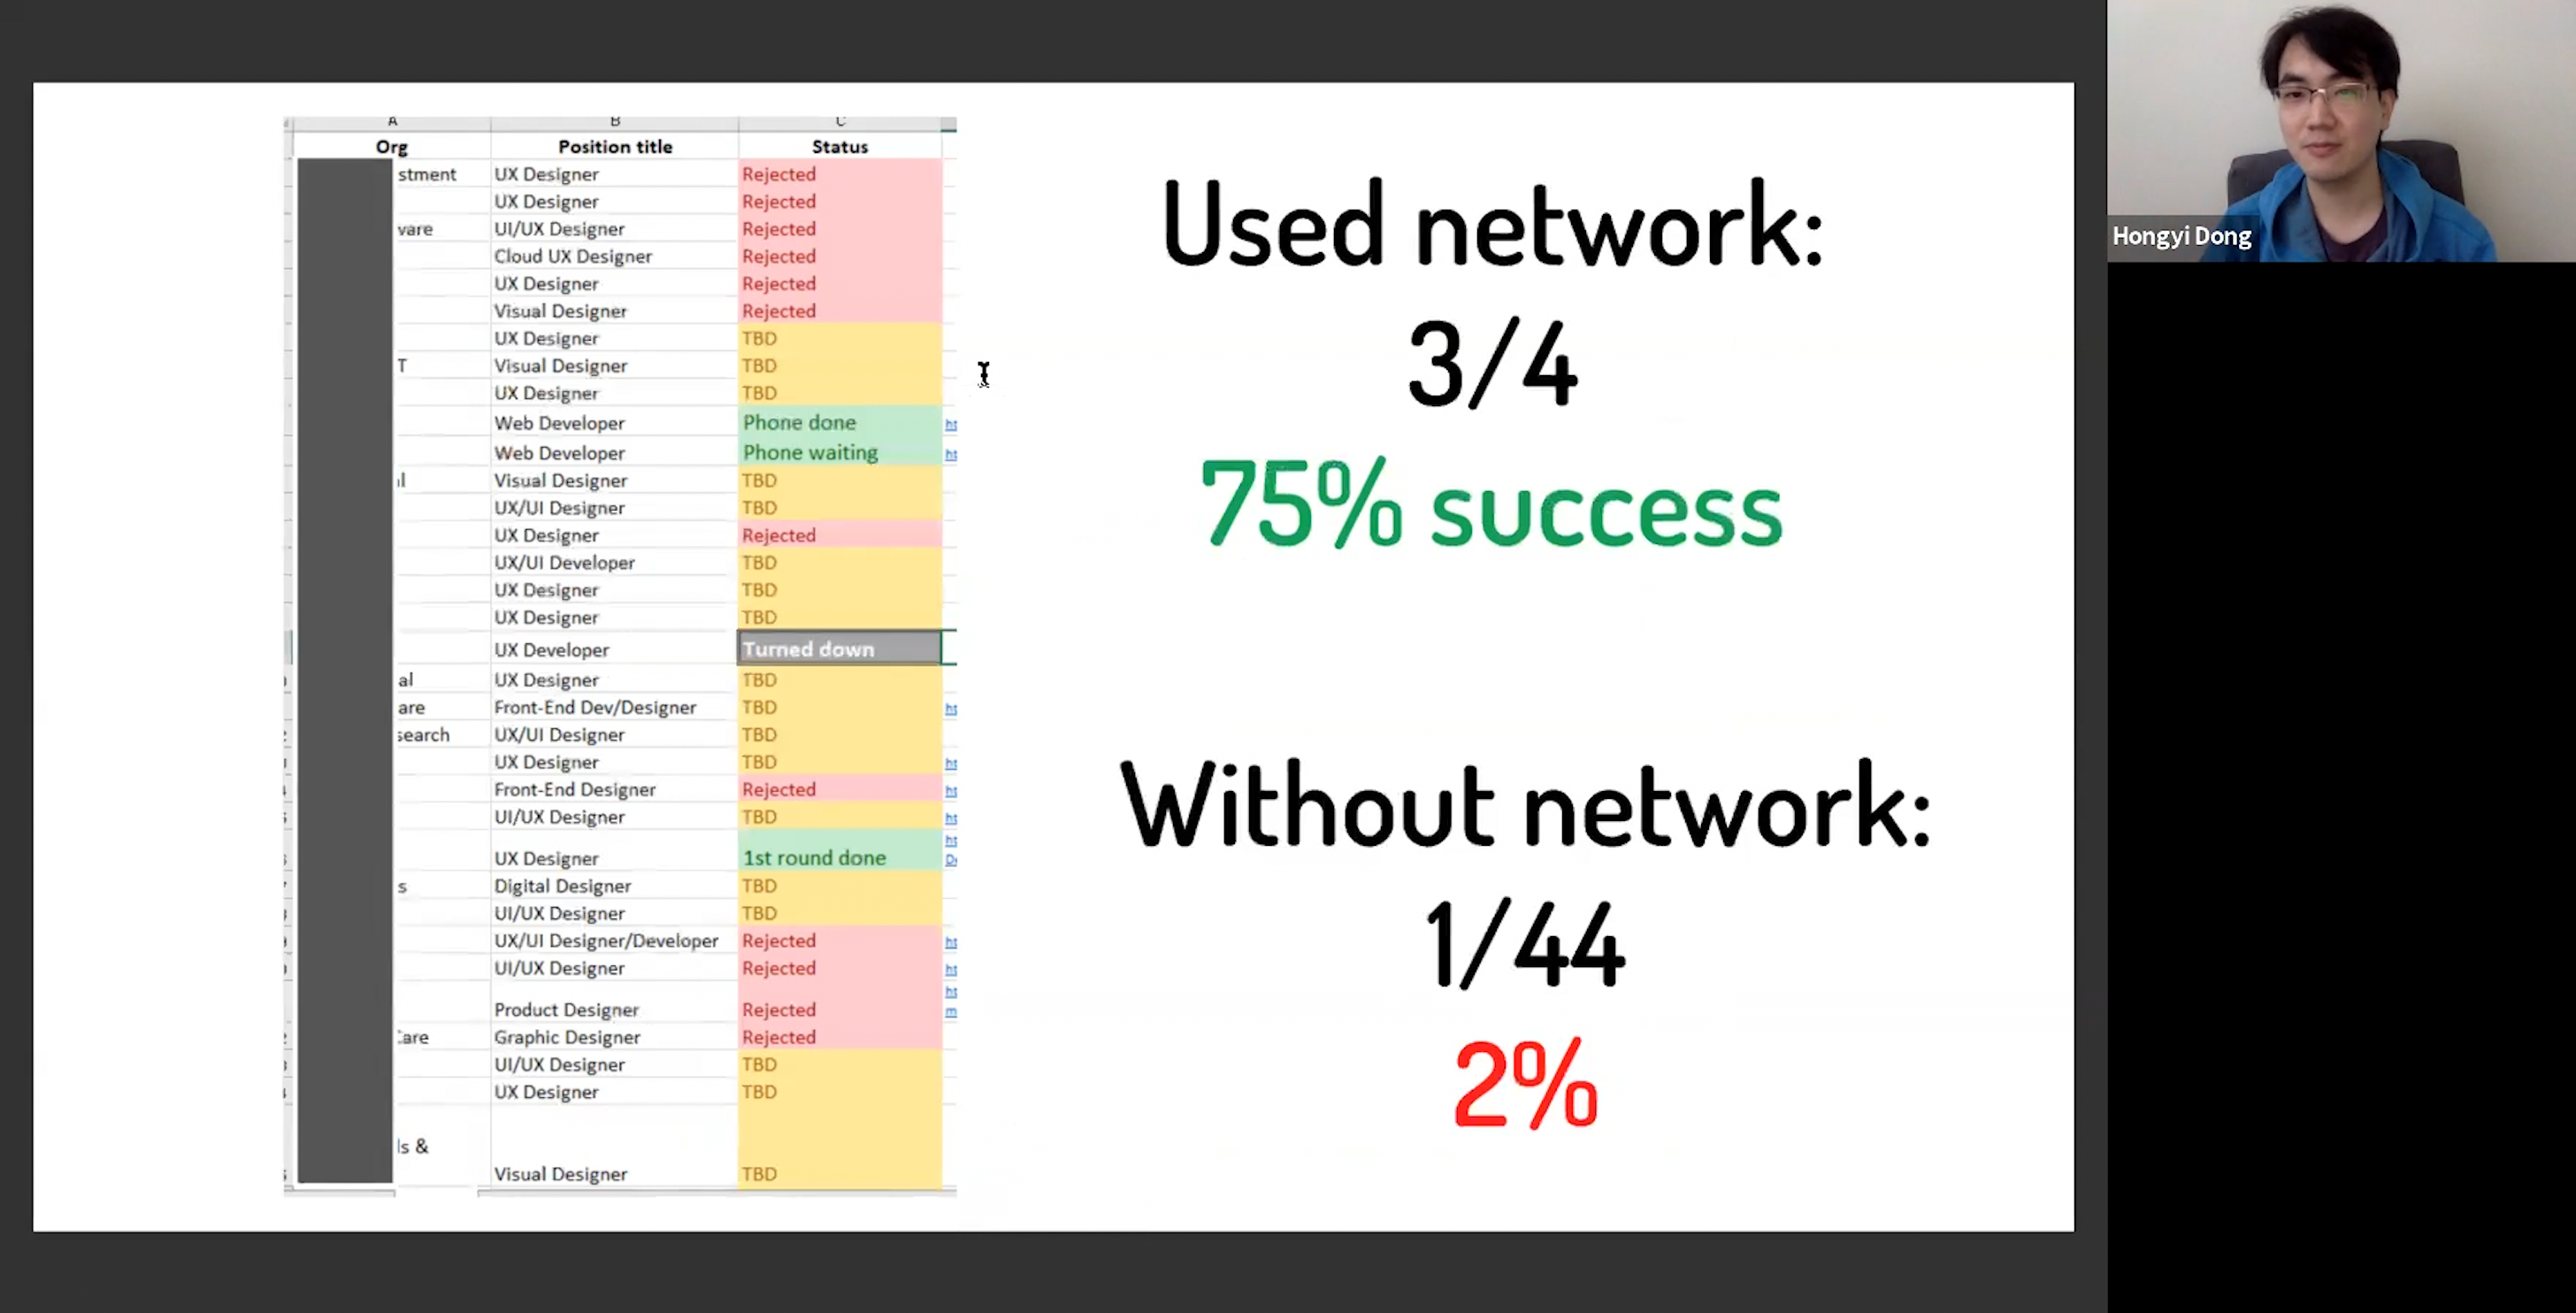
How to network for a job (Hong Yi Dong)
Visit ChatGPT and select your previous chat to continue with the same premises (or re-type the context from the last class).
Discuss both your own and ChatGPT's performance in this exercise. How valuable was this experience? Did you discover any missing knowledge you would be likely to need for future employment opportunities?
Revise your project based on feedback received in the previous class, and post the URL (or, if you're using Expo CLI, a QR code at class time) to #final-project.
Create a brief screencast to show off your final project. This video can be under 30 seconds provided it shows all the screens in your app, including adding a record. This is easiest to do by recording directly on your phone and then posting using the Slack mobile app.
For extra credit, you may also choose to explain one coding technique used in your app. Ensure that any code you show on the screen is zoomed in far enough to be legible, following the suggestions in the guidelines.
Post this movie to #screencast in Slack.
⚠️ Do not just post a link to YouTube or Vimeo.
⚠️ For now, iPhone/Mac users can post the native QuickTime (.mov) file. Since QuickTime videos can't be accessed by most browsers, however, you must convert this to an MPEG-4 or WebM file for your final submission using a utility like Miro Video Converter.
⚠️ If you are explaining your code, do not give a general overview, but instead focus on one specific technique and explain it thoroughly.
You can't use CSS grid in React Native, but you can emulate it with flex as in this demo.
<!-- Create a login page for a website to track lost pets -->
⚠️ You must have opened an entire folder on your hard drive in VS Code to see the preview.
ℹ️ More on using Copilot in VS Code
-
Revise your demo screencast based on the feedback you've received so far. Make especially sure that any code you show on the screen is zoomed in far enough to be legible.
Post the actual movie (not link) as an MPEG-4 or WebM file to #screencast.
Required for all students whose cumulative grade by the previous class is at a B- or below.