In person at 202 Shibles, 2-3:15pm Mondays and Wednesdays, with individual labs outside of class with the teaching assistant.
Instructor: Jon Ippolito, 581-4477, jonippolito.net.
Office hours: The instructor's office hours are Mondays and Wednesdays 1:20-2pm in the lobby of Neville or via Zoom (see links in Slack #reference channel); please sign up in advance via the instructor's Google Calendar. The teaching assistant's office hours are TBD .
Contributions are measured by quality and quantity of online and oral comments, as well as attempts to get help and help others.
Coding assignments are graded according to rubrics that consider:
Grades are out of 100: 59 or below = F (failing), 60-69 = D (poor), 70-79 = C (satisfactory), 80-89 = B (good), 90-100 = A (outstanding).
📝 Survey
🐙 Assignment posted to Github
P5js assignment
Assignment posted to Slack
👆 Interactive exercise that you don't turn in.
🗣 Discussion (in person or Zoom)
👨🏫 Live teacher presentation
📖 Reading
🍿 Viewing
🏅 Badge
None
To accommodate remote learning, you're required to get a free P5js account.
You'll get an invitation to our class Slack team, which will be our primary communication platform (rather than Brightspace), and where you'll post exercises.
You'll need to make an account on GitHub, where you'll submit your full assignments.
This class requires a laptop for in-person collaboration. The University Bookstore offers laptops that meet New Media requirements; a recent MacBook Pro or MacBook Air will do.
Your instructor will require periodic breaks during class to support your physical and mental health.
Students in this class are encouraged to actively look to other peoples’ code for inspiration in solving problems. However, this comes with strict caveats:
Generative AI has become an important tool in a professional programmer’s toolkit, but studies indicate it only helps if you already know what you’re doing. For that reason, you are only allowed in this class to use AI in the following contexts:
🙅 Do not use AI to generate comments on other students' posts, which can degrade the personal connections over ideas and experiences that helps connect us in a digital space.
We also encourage adding your feelings, good or bad, about the experience in your posts. For more on the promise and perils of generative AI, see Learning With AI.
(You may also opt-out of using them without explaining why, in which case the instructor will give you a parallel assignment.)
😅 Nervous about all this? Don't worry, we welcome any questions you have about how to use AI responsibly!
-
-
🥚🥚🥚
🥚🥚🥚
🥚🥚🥚
🥚🥚🥚
🥚🥚🥚
🎩 Click Auto-refresh at upper left to auto-play your sketch after any change.
⚠️ You have to manually save your sketch if you want it to auto-save in future.
-
-
-
Complete the two-minute survey on your programming experience in #reference so your instructor can tell how prepared you are for this material and adjust accordingly.
Using code from AI or other programmers
Here's the best way to ask for help debugging your code remotely:
⚠️ Pressing Cmd-S when you've clicked outside the editor can summon a dialog box for saving to your hard drive. To avoid that, choose File > Save inside the editor.
Say "I can't get the upper right box to line up" instead of "It's not working."
When you post to Slack, other students can learn from your example (and possibly respond faster than the instructors). If you don’t want to share your problem publicly, you can Direct Message your TA or me on Slack, though it may take us longer to reply.
🖱️ Channels > Manage > Browse
⌨️ Command/Control-K
Where to put your code:
// Put commands in setup() that configure the general conditions of your sketch.
setup() {
	createCanvas(400, 300) // Sets the size of your sketch.
}
// Put commands in draw() that happen every time your sketch refreshes (60 times per second).
draw() {
    background(220);
	...
}
Choosing your paintbrush and colors:
fill("turquoise") // You can use many common color names.
stroke("teal")
strokeWeight(6)
noFill()
noStroke()
What do the numbers in the parentheses ("arguments") mean?
line(10, 20, 50, 20); // The arguments are the points x1, y1 and x2, y2.
triangle(30, 75, 58, 20, 86, 75); // The arguments are the x, y of the three points.
rect(10, 10, 50, 30); // The arguments are the x, y position and width, height of the rectangle.
quad(189, 18, 216, 18, 216, 360, 144, 360); // The arguments are the x, y of all four corners of the quadrilateral.
ellipse(30, 30, 40, 60); // The arguments are the x, y position and width, height.
arc(479, 300, 280, 280, 180, 360); // The arguments are the x, y position, width, height, and the start and stop angle.
angleMode(DEGREES); // Put this in setup to use degrees out of 360 for the last two arguments of arc().
p5js default is RGB: Red, Green, Blue, from 0 (none) to 255 (maximum).
// This is red.
background( 255, 0, 0 ) ;
// This equal parts red, green and blue, so it makes gray.
background( 100, 100, 100 ) ;
// This is a shorthand when all three values are equal.
background( 100 ) ;
function setup() {
  createCanvas(400, 400);
}
function draw() {
  // Red Green Blue is the default.
  fill( 255, 0, 0) ; // Red.
  // is the same as:
  fill( "rgb(255, 0, 0)" ) ; // Also red.
  rect( 10, 10, 100, 100 ) ;
  // You can use CSS color names.
  fill( "magenta" ) ; // Magenta (duh).
  rect( 90, 90, 100, 100 ) ;
  // You can use Hue Saturation Lightness.
  fill( "hsl(60, 50%, 50%)" ) ; // A gold color.
  rect( 170, 170, 100, 100 ) ;
  // You can use Hue Saturation Lightness Alpha.
  fill( "hsla(180, 50%, 50%, .5)" ) ; // A transparent turquoise.
}
Hues go from 0 to 360 (just the number—don't add % or degrees).
Saturation goes from 0% (gray) to 50% (dull) to 100% (rich).
Lightness goes from 0% (black) to 50% (medium) to 100% (white).
To get the strongest color, pick a hue and then set Saturation to 100% and Lightness to 50%.
  // Fill with a bright turquoise.
  fill( "hsl(180, 100%, 50%)" ) ;
  // Fill with a dull turquoise.
  fill( "hsl(180, 30%, 50%)" ) ;
}
Save your Sketch and post its URL to #matching-colors
-
-
-
Save your sketch on your P5js account, and post the URL to the #assignment-1-challenge-1 Slack channel.
(😅 For this first challenge, you only need to post your P5js URL; we will review how to write the accompanying document in class.)
How to write your commit statement.
Pick your color before drawing a shape.
// ❌ BAD.
function draw() {
	...
	rect(10, 10, 100, 200);
	fill("red");
}

// ✅ GOOD.
function draw() {
	...
	fill("red");
	rect(10, 10, 100, 200);
}
Put each command on a separate line inside the braces {}
// ❌ BAD.
function setup() createCanvas(400, 400) {

}
fill("red");
function draw() {
	background(220);
}
rect(10, 10, 100, 200);

// ✅ GOOD.
function setup() {
	createCanvas(400, 400);
}

function draw() {
	background(220);
	fill("red");
	rect(10, 10, 100, 200);
}
Variable and function names are camelCase 🐪.
You can set a variable multiple ways, and you don't have to declare it or its type ahead of time. These are basically the same:
Delimiters
Comments
Numbers
Jargon
If you find yourself using over and over:
You can put variables above setup() if you want them to be defined everywhere.
🙂 Some variables are predefined for you by p5js.
width // The width of the canvas.
height // The height of the canvas.
mouseX // The left position of your mouse.
mouseY // The top position of your mouse.
⚠️ You can't refer to a variable before it's defined:
Start writing out the rectangles, and then look at the numbers you keep repeating--you can make these variables, eg:
let boxHeight = 80 ;
let boxWidth = 40 ;
rect(0, 0, boxWidth, boxHeight) ;
rect(80, 0, boxWidth, boxHeight) ;
...
Consider making the number of rows a variable too. You can calculate a new variable from old ones, eg:
let numberOfRows = height / boxHeight ;
Fork this Initials From Shapes sketch. Substitute your own initials and colors, then post to #x-initials. Here's a list of valid CSS color names you can use.
If you have a diagonal line in your initial (like a letter M), consider making it with a line set to "mitre" (sharp corners):
function draw() {
	...
	stroke("blue"); // Give the line a color.
	strokeWeight(20); // Make the line thick.
	strokeJoin(MITER); // Ensure sharp corners at intersections
	// The first pair of numbers is the top and left of the starting point.
	// The second pair is the top and left of the end.
	line(100, 100, 100, 300);
}
If you have a curved line in your initial (like a letter J), consider making it with an arc:
function setup() {
	...
	// Setting this makes it easier to specific curves in your letters.
	angleMode(DEGREES)
}

function draw() {
	...
	noFill(); // Prevent color inside the arc.
	stroke("blue"); // Give the arc a color.
	strokeWeight(20); // Make the arc thick.
	// The first pair of numbers is the top and left of the starting point.
	// The middle pair is the width and height.
	// The last two parameters are where the curve starts and ends,
	// in clockwise degrees.
	arc(115, 250, 100, 100, 0, 180);
}
-
Fork this Chatbot Practice sketch and use the class chatbot (link in #reference) to help you complete the exercises. The result should be a blue triangle on top of a red square.
⚠️ If your email is missing, stop and contact the TA—do not create a new identity.
⚠️ It may take a few seconds—refresh once instead of clicking repeatedly.
Student name:
Student email:
Assignment: 1
---
Challenge: 1
P5.js sketch URL:
Debugging chat transcript URL (optional):
How it went:
How it went:

I was able to create the grid of squares by just tweaking the positions of each box. At first I couldn't get the fill colors to go in the right boxes. I pasted an example into the class chatbot and it hinted that I should reset the fills when changing colors.

Then I tried to add a gradient but the grid kept turning all white, so I gave up on this option.

Overall I feel that I understand how to use fills to add color, but I need more practice with hsl color parameters.
You may also accept GitHub's AI-generated message and/or type an additional description.
Leave the default settings, eg Commit directly to the main branch.
Student name:
Student email:
Assignment: 1
---
Challenge: 1
P5.js sketch URL:
Debugging chat transcript URL (optional):
How it went:

---
Challenge: 2
P5.js sketch URL:
Debugging chat transcript URL (optional):
How it went:
💡 If you ever want to revise an entry, eg to update your recap, you can edit the document and just save it again; GitHub will track your changes so the instructor can see what you changed.
⚠️ Never delete earlier entries—only add to them or make new ones.
-
To submit, follow the workflow shown in the previous class:
⚠️ You could be penalized if you don't follow the exact procedure explained in the last class, so please review those instructions carefully if you're not sure how to submit.
-
-
Words in all caps like CORNER or DEGREES are "constants," a special kind of variable that doesn't change but is a placeholder for a complex value that the browser understands.
Browsers, like people, read from the top down. Whatever you write below can overwrite what's written above.
Default to angleMode(RADIANS), but you can switch to angleMode(DEGREES)
Default to rectMode(CORNER), but you can switch to rectMode(CENTER)
Default to ellipseMode(CENTER), but you can switch to ellipseMode(CORNER)
🎗 How to draw a triangle.
line(10, 20, 50, 20); // The arguments are the points x1, y1 and x2, y2.
triangle(30, 75, 58, 20, 86, 75); // The arguments are the x, y of the three points.
⚠️ Bermuda triangles (Sample sketch)
If possible, draw combined shapes in the upper left corner, and use variables to move them.
translate(0, 0) is normal. translate(50, 10) will move a shape to the right 50 pixels and down 10 pixels.
shearX(0) is normal; shearX(20) will skew a shape to the right; shearX(-20) will skew a shape to the left.
scale(1) is normal; scale(2) is twice as big; scale(.5) is half as big.
rotate(0) is normal; rotate(45) will rotate 45° clockwise if you've previously set angleMode to DEGREES.
⚠️ rotate() turns a shape around the origin (0,0), not the center of the shape! It's hard to use unless you combine all your shapes in the upper left corner and then translate them to your desired position on the canvas.
⚠️ A transform will change everything below it, which can have unintended consequences. So reset it immediately after use. (Later we'll learn a better technique with push()/pop().)
translate(5,20); // Move forward.
ellipse(10,10,100); // Draw a circle.
translate(-5,-20); // Move back again.
// or
scale(2); // Double in size.
rect(10, 10, 100); // Draw a square.
scale(.5); // Shrink back to normal size.
🎗 How to draw a rectangle.
rect(10, 10, 50, 30); // The arguments are the x-position, y-position, width, height of the rectangle.
rect(10, 10, 50); // Using only one parameter for both width and height makes a square.
🤔 Imagine now that you had a lot of rectangles to space this way: a variable makes it much easier than tweaking each number individually!
🖼 Sample result (extreme).
🎩 Advanced option: make a sketch that uses variables to adjust square color as well as size.
Save your sketch on your P5js account, and post the URL to the #assignment-1-challenge-3 Slack channel.
Adding variables to adjust the position and growth works for individual shapes but is trickier with clusters of shapes. To see this, let's help Goldilocks fit three bears of increasing size into her house.
// Baby bear.
rect(0, 0, 40); // A bounding box for our bear.
ellipse(20, 20, 30); // Head.
ellipse(5, 5, 10); // Left ear.
ellipse(35, 5, 10); // Right ear.
Sample result • Cuter version 🐻
⚠️ Do not include the background().
😯 Even though we added the same variables, you'll notice the dimensions of the mama and papa bear are off: the ears are out of place, and the circles don't keep pace with the squares anymore. That shows that proportions are tricky for clusters of shapes.
Fortunately, P5js has transformation methods that solve this problem for us. scale() takes a decimal that is the amount you want the shapes that follow to grow. translate() takes two parameters corresponding to a shift in the x and y directions.
ℹ️ At this point the new bears will be invisible because they are just overwriting the original one, so leave in the comments to distinguish the three bears.
⚠️ Don't delete the variables at very top.
ℹ️ You should see the mama bear move to the right.
ℹ️ The mama bear should get bigger, but with the correct alignment and proportions.
😅 Note that we didn't have to add any variables inside our ellipse() methods. translate() and scale() did all the work for us!
🧐 Note that the papa bear gets larger than mama bear even after the same scale change. Why?
⚠️ Try switching the order of translate() and scale() and you'll see the good bear goes off the screen. That's because scale changes all the numbers below it, including the arguments to the translate command!
line(10, 20, 50, 20); // The arguments are the points x1, y1 and x2, y2.
triangle(30, 75, 58, 20, 86, 75); // The arguments are the x, y of the three points.
rect(10, 10, 50, 30); // The arguments are the x, y position and width, height of the rectangle.
quad(189, 18, 216, 18, 216, 360, 144, 360); // The arguments are the x, y of all four corners of the quadrilateral.
ellipse(30, 30, 40, 60); // The arguments are the x, y position and width, height.
arc(479, 300, 280, 280, 180, 360); // The arguments are the x, y position, width, height, and the start and stop angle.
angleMode(DEGREES); // ⚠️ Put this in setup to use degrees out of 360 for the last two arguments of arc().
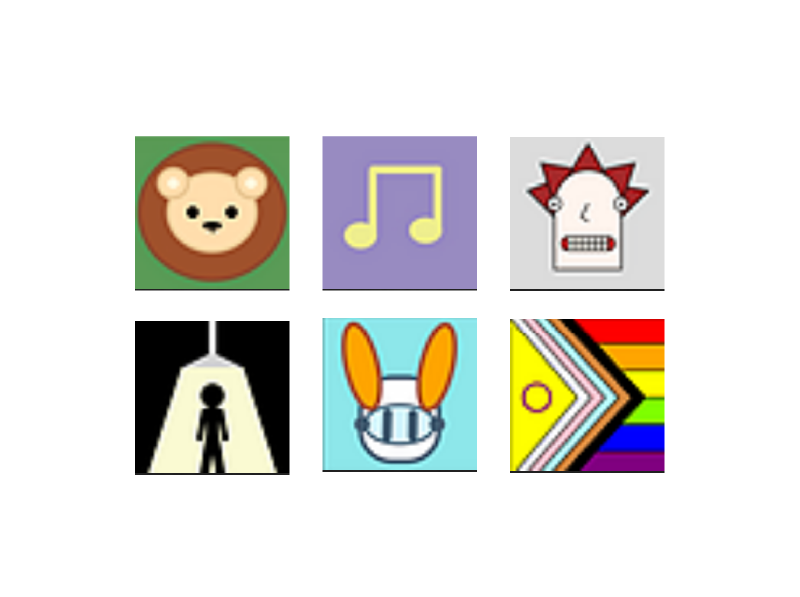
Start a new sketch called something like "Mary's avatar." Using a variety of P5js shapes and colors create a icon that will represent you for this class. The icon can be abstract or represent a person or animal, as long as it's distinctive and can be read at a small scale, like the size of the Slack icon. If you can't think of a picture to represent you, just draw your initials with some colors that feel right for you (make them from shapes, not actual text). Examples.
Your overall shape should be roughly squarish in dimensions and fill the canvas, so that it will make a good thumbnail.
❗️Fit your shapes to the upper left corner of the sketch! You can then add translate() and scale() commands at the top of your draw() function to center and size your avatar to fill the canvas.
When you're satisfied, save a screenshot the result (Shift-Command-4 on MacOS or Windows-Shift-S on Windows).
Instead of submitting to a Slack channel, just make this your Slack profile picture by clicking on your user thumbnail at upper right, then choosing Edit Profile. Show your new Slack profile to your instructor before leaving.
-
Save your sketch on your P5js account, and post the URL and related information to Github.
-
-
width and height are defined by createCanvas()
⚠️ Changing the file name of a Sketch doesn't duplicate the Sketch; you have to log in as your name and Save to do that.
Click in the code first, else your browser may try to save the entire web page.
File > Download
⚠️ This will save the code as an HTML file, not a still image.
function setup() {
	// Set your canvas to a variable.
	canvas = createCanvas(400, 400); // ⚠️ Omit the word "let" so you can refer to this below.
	// Prevent the sketch from looping.
	noLoop(); // ⚠️ If you don't add this, your sketch will save a new image on every loop!
}

function draw() {
	// Make a basic image from some shapes.
	background(220);
	fill("red");
	rect(200,200, 50);
	// Save the canvas as an image to your browser downloads folder.
	save(canvas, 'avatar.jpg');
}
If in doubt, you can always right-click on the image to save it as a PNG or screenshot it (eg, Shift-Command-4 on MacOS or Windows-Shift-S on Windows).
> versus < versus !
= versus ===
&& versus ||
if ... else
if ... else if ... else
/* Template:

if (PUT TEST HERE) {
  PUT CHANGE HERE;
} else {
  PUT FALLBACK HERE;
};

*/
// Example:
if ( relationshipType === "romantic") {
  sendRose( "red" ); // Love interest!
} else {
  sendRose( "white" ); // Just friends.
};
🎂 Birthday metaphor
Function definition v. function call.
Your function definition, like function addBird() {...}, goes outside of the setup() and draw() functions at zero indent.
Your function call, like addBird(), goes in the draw() function.
Tidy your code so you can see the indents for each brace.
Duplicate the sketch you created for your first avatar (File > Duplicate) and call it something like "Mary's interactive avatar." Add a conditional (if statement) that changes its appearance--fill, stroke, scale, position, anything--when the user's mouse is on the right half of the canvas. (If you want to get fancy, make the colors change as the user moves the mouse to different parts of the screen.) Post your resulting sketch to #x-interactive-avatar.
Boring example • Less boring example
-
Save your sketch on your p5js account, and paste the URL and related information into the appropriate file on GitHub as described in the Assignment Submission Guidelines.
-
Save your sketch on your p5js account, and paste the URL and related information into the appropriate file on GitHub as described in the Assignment Submission Guidelines.
✅ Tidy your code right before submitting.
Choose the Edit > Tidy Code pull-down option \frequently while you’re coding your Sketch. Some errors, like a missing or extra brace } , are much easier to find if your code is indented properly. But once you have an error, Tidy Code won't work anymore ☹️.
✅ Make sure you have all of your semicolons.
✅ Add comments to explain different sections of your code.
✅ Add special comments in code and/or GitHub:
✅ Share any error messages from the Console!
❌ Don't leave in your sketch:
// Jon, I tried a variable for the size here but got a "balloonWidth is undefined" error:
fill("red");
ellipse(10, 10, balloonWidth);
mousePressed(): a function called once when the user clicks.
mouseIsPressed: a variable true as long as the user is holding the mouse down.
Example: click to show the bunny's winter fur:
function draw() {
	...
	addBunny();
}

function addBunny() {
	if (mouseIsPressed) {
		fill("white");   // It's winter time--blend in with the snow!
	} else {
		fill("brown"); // Normal fur is fine.
	}
	ellipse(10, 10, 50); // Draw the bunny.
	...
}
Adjust your function's options by adding parameters inside ().
function draw() {
	...
	addBunny(200, 200, .5);
}
function addBunny(x, y, sizeFactor) {
	translate(x, y) ; // Move the bunny to a custom position.
	scale(sizeFactor); // Scale the bunny to a custom size.
	ellipse(10, 10, 50); // Draw the bunny in the upper left corner by default.
	...
}
Transforms can help you re-position sprites
push() and pop() can prevent those transforms from leaking onto other shapes. Demo
function draw() {
	...
	addBunny(200, 200, .5);
}
function addBunny(x, y, sizeFactor) {
	push() ;
	translate(x, y) ;
	scale(sizeFactor);
	ellipse(10, 10, 50); // Draw the bunny.
	...
	pop() ;
}
/*________________ Baby bear. ________________*/
bear(50, 50, 1);
/*________________ Mama bear. ________________*/
bear(50, 150, 1.5);
/*________________ Papa bear. ________________*/
bear(50, 300, 2);
-
-
-
This will be helpful for a future assignment to create your personal flag (eg, if you want to make a star).
-
1. To reuse code
or
2. to wait.
Make your sprite positionable.
Adjust your function's options by adding parameters inside ().
function draw() {
	...
	addBunny(200, 200, .5);
}
function addBunny(x, y, sizeFactor) {
	translate(x, y) ; // Move the bunny to a custom position.
	scale(sizeFactor); // Scale the bunny to a custom size.
	ellipse(10, 10, 50); // Draw the bunny in the upper left corner by default.
	...
}
Duplicate this sketch of a Jupiter-like planet, then:
🤔 Notice that the positions and scales don't work as you'd expect.
Don't delete this sketch--you'll need it for the next part.
⚠️ Variables defined with let can only be accessed inside that function. Leave off the let if you plan to use it outside of that function.
mousePressed(): a function called once when the user clicks.
mouseIsPressed: a variable true as long as the user is holding the mouse down.
Example: click to show the bunny's winter fur:
function draw() {
	...
	addBunny();
}

function addBunny() {
	// translate and scale go here.
	...
	if (mouseIsPressed) {
		fill("white");   // It's winter time--blend in with the snow!
	} else {
		fill("brown"); // Normal fur is fine.
	}
	ellipse(10, 10, 50); // Draw the bunny.
	...
}
🐞 Don't style your sprite after drawing it.
function addBunny() {
	...
	ellipse(10, 10, 50); // Draw the bunny.
	...
	if (mouseIsPressed) { // ❌ This is like picking up a brush after you've painted the bunny ☹️
		fill("white");
	} else {
		fill("brown");
	}
}
🐞 Don't overwrite your conditional with a later command.
function addBunny() {
	...
	if (mouseIsPressed) {
		fill("white");
	}
	fill("brown"); // ❌ This will make the bunny always brown ☹️
	ellipse(10, 10, 50); // Draw the bunny.
	...
}
let catName = "Schroedinger" ; // String variables are a series of characters.
let catAge = 12 ; // Number variables can be integers or decimals.
let catIsAlive = true ; // Boolean variables can be true or false.
🙂 Unlike other programming languages, you don't have to specify the type explicitly. JavaScript will figure out the type as soon as you set the variable to something.
rocketWidth = 100 ; // Strings and numbers are usually a noun or noun phrase.
function moveRocket() {...} ; // Functions are usually verbs.
rocketIsMoving = false ; // Booleans can be written like a sentence.
let numberOfDogs = 1 ; // This is global despite the prefix because it's at the root level;
function setup() {
	numberOfCats = 6 ; // This is global, and can be accessed outside of setup();
	let numberOfRabbits = 12 ; // This is local, and CANNOT be accessed outside of setup();
	var numberOfWombats = 0 ; // This is also local, and CANNOT be accessed outside of setup();
}
catName = "Grumpy" ; // This is assignment.
catName == "Grumpy" ; // This is a test.
catName === "Grumpy" ; // This is a slightly more accurate test.
if ( rocketIsMoving === true ) {..}
can be shortened to
if ( rocketIsMoving ) {..}
if ( cat === true ) {
	rocketY = rocketY + speed ;
}
mousePressed(): a function called once when the user clicks.
mouseIsPressed: a variable true as long as the user is holding the mouse down.
Duplicate this sketch and complete the numbered steps to fit the cat in the box.
Save your sketch on your p5js account, and paste the URL and related information into the appropriate file on GitHub as described in the Assignment Submission Guidelines.
A flag for the Internet: Net flag by Mark Napier
(Note that Java applets are deprecated, so this may read as a security risk in your browser.)
🏴🇩🇯🇹🇬 Sample student flags from 2024 🇨🇺🇰🇮🇰🇲
Bright colors, believable flag
Limited colors, believable flag
Duplicate your "Populate the heavens" sketch from the previous class and apply these changes:
addPlanet(80, 40, .5);
addPlanet(80 + planetSpeed, 40, .5);
🤔 Nothing changes. This is because you hard-coded it instead of using a variable.
function setup() {
	...
	planetSpeed = 1;
	planetX = 80;
}
function draw() {
	addPlanet(planetX, 40, .5);
}
function draw() {
	addPlanet(planetX, 40, .5);
	planetX = planetX + planetSpeed;
}
✅ The planet should now move across the screen. Change the planetSpeed variable to your liking.
Using the approach shown in the Random Race Demo, add random speeds to one or more of your planets.
Duplicate the Collision Exercise template and fill in the blanks to make the balloon change when it is struck by the dart. Post your new URL to #x-pop-balloon.
💁♂️ Working example
Save your sketch on your p5js account, and enter the URL and related information in GitHub.
-
-
for (let linesDrawn = 0; linesDrawn < 36; linesDrawn++) {
	rotate(10);
	line(20, 20, 100, 100);
}
Duplicate the Draw a shape with a loop template and create your own complex shape from smaller shapes using a loop. Post the URL before your leave to #x-shape-from-loop.
Save your sketch on your p5js account, and paste the URL and related information into the appropriate file on GitHub as described in the Assignment Submission Guidelines.
Visit #x-shape-from-loop and review the star-like shapes by the three classmates who posted immediately before you and the three who posted immediately afterward. Add a "thumbs up" reaction emoji to up to two (2) of these six sketches.
Creating shadows
// Set up the shadow.
drawingContext.shadowOffsetX = 5;
drawingContext.shadowOffsetY = -5;
drawingContext.shadowBlur = 10;
drawingContext.shadowColor = 'black';
// Draw the rectangle.
rect(0, 0, 100, 100);
Creating gradients
let greenBlueGradient = drawingContext.createLinearGradient(50, 50, 100, 100);
greenBlueGradient.addColorStop(0, 'yellowgreen');
greenBlueGradient.addColorStop(.7, 'turquoise');
drawingContext.fillStyle = greenBlueGradient;
drawingContext.rect(50, 50, 100, 100);
drawingContext.fill();
Complete the midterm course evaluation in #reference before you leave class.
-
Save your sketch on your p5js account, and paste the URL and related information into the appropriate file on GitHub as described in the Assignment Submission Guidelines.
-
In this more advanced tutorial, Dan Shiffman makes flower shapes using a loop, trigonometry functions, and polar coordinates.
Save your sketch on your p5js account, and paste the URL and related information into the appropriate file on GitHub as described in the Assignment Submission Guidelines.
You will correct a number of sketches while working in a team. You will pass around a single laptop, with one person at a time making one change during her turn.
(⚠️ If you move a line forward and back again, it counts as 2!)
Your team's goal is to fix as many self-inflicted bugs in a given time as possible
How could you condense this code using a loop?
Visit one of your sketches with a sprite you made, eg the "catcher" sprite from Assignment 3 or the "star" sprite from the last in-class exercise. Copy the code to build the sprite and add it to a new sketch. Make sure your sprite-building code:
Then duplicate the Nested Loops Exercise Template and paste in your function at the bottom. Change the variable names and parameter settings to fit your sprite evenly into the canvas. You may want to expand the canvas dimensions or resize your sprite with a command like scale(.5) at the start of your function.
Once you're satisfied with the spacing, post your sketch URL to #x-sprite-grid.
Save your sketch on your p5js account, and paste the URL to the Slack channel #assignment-3-challenge-4.
You can set a Boolean (true/false) variable to a comparison.
let studentPassedTest = (grade > 65) ; // It's common to put comparisons between parentheses ().
You can move a sprite at an angle.
rocketX = rocketX + 3 ;
rocketY = rocketY + 5 ;
addRocket( rocketX, rocketY ) ;
👎 Testing for x and y overlap doesn't work well for non-rectangular sprites.
👍 P5js has a formula that measures the distance between their centers.
let distanceForCollision = 10 ;
let rocketHitsMoon = ( dist(rocketX, rocketY, moonX, moonY) < distanceForCollision );
if ( rocketHitsMoon ) {
    console.log( "The Eagle has landed!" ) ;
} ;
🎗 Unlike rect(), the x and y for an ellipse() are by default at its center.
🎗 You can comment or uncomment multiple lines of code with Command-/ (Control-/ on Windows).
(Don't accidentally uncomment a comment or it will throw an error.)
// Totally cool comment, no problem here! ✅
Whoops, forgot the leading slashes in this comment ❌
Change the Collision at an Angle sketch, which sends a projectile at an angle, to work with at least one of the sprites you have made so far for this course. You can start from the template that uses x,y inequalities or the template that uses the distance formula. Post your URL to #x-hit-8-ball.
-
The Hardest Trip - Mandelbrot Fractal Zoom
random(360) gives a number between 1 and 360.
random(180, 360) gives a number between 180 and 360.
🛠 If you want to randomize sprites in a loop without creating jitter, add noLoop() to your setup() function.
noLoop() is useful whenever you are adding adding randomness outside of setup(), or writing your own loop, or running a recursive function.
Visit the Random Race Demo sketch, which launches a ship that tries to catch up to the moon. In this sketch, both the ship and moon have random speeds and random starting positions.
As a breakout group, decide what sprite each person is going to add to an abstract landscape; examples might include trees, clouds, birds, mountains, buildings, or cars. Then each participant should duplicate and customize the Draw a Random Landscape template. Each should sketch should include a sprite function that takes a parameter that can be randomized, such as position, scale, color, etc. Each member's sketch should use a loop to display 5 or more of these randomized sprites to the screen.
🎩 More adventurous students can try making a recursive (eg, fractal) shape by starting from the Random Landscape with Fractal template instead.
Then choose a coordinator to paste the code from the other members to a main sketch that adds shapes at random intervals and parameters to produce a collective landscape. Every time you run the sketch, it should generate a different landscape.
⚠️ Be sure to write your sprite function so that it:
⚠️ Don't forget to add noLoop() to your setup() function.
Post the URL to #x-random-landscape and be sure to tag all the participants (eg @mary @sam @jasmine).
Save your sketch on your p5js account, and paste the URL and related information into the appropriate file on GitHub as described in the Assignment Submission Guidelines.
See also Code As Creative Medium
Whoever posts must tag everyone else in the group for them to get credit.
Move the code around until this sketch works
if ( ... ) { ... }
&&
||
!
// ...
/* ... */
Quilt that responds to mouse by Andy Lapham.
Quilt that responds to keys by Bharathvaj Ganesan.
More animated patterns by Lucy Yip
Duplicate the Draw Sprites from an Array exercise. Uncomment the options inside the draw() function to draw from a limited set of sprites randomly or according to the order in the array.
Save your sketch on your p5js account, and paste the URL and related information into the appropriate file on GitHub as described in the Assignment Submission Guidelines.
-
-
🎗 // ... versus /* ... */
🎗 A number like 12 is just what it seems to be, but P5js assumes an unquoted word like red is a variable.
myArray = [🐶, 🐱, 🐦, 🐴, 🐵] ;
myArray[3] === 🐴 // True.
for ( let columnsDrawn = 0; columnsDrawn < 4; columnsDrawn++ ) {
	star.x = star.startX + offsetRight ;
}
⚠️ When creating your own loop, consider adding noLoop() to setup() to prevent draw() from accidentally animating.
If you copy the for loops and don't change things, you can crash your editor. If you repeat the same counter++, then you can crash, even if you uncheck auto-refresh, it will still crash if you have an infinite loop.
⚠️ Do not define new functions inside of draw()
⚠️ Don't use local variables inside of setup()
// You could define each sprite with different variables.
star1X = 100;
star1Y = 150;
star1Scale = 1;
star1Color = "white";

star2X = 200;
star2Y = 250;
star2Scale = 1.5;
star2Color = "yellow";

star3X = 300;
star3Y = 350;
star3Scale = 2;
star3Color = "orange";

addStar(star1X, star1Y, star1Scale, star1Color);
addStar(star2X, star2Y, star2Scale, star2Color);
addStar(star3X, star3Y, star3Scale, star3Color);

function addStar(x, y, scale, color) {
	translate(x, y);
	ellipse(0, 0, 50)
}

// Or you can define each sprite with a different object.
star1 = {
	x: 100,
	y: 150,
	scale: 1,
	color: "white"
}
star2 = {
	x: 200,
	y: 250,
	scale: 1.5,
	color: "yellow"
}
star3 = {
	x: 300,
	y: 350,
	scale: 2,
	color: "orange"
}


addStar(star1);
addStar(star2);
addStar(star3);

function addStar(star) {
	translate(star.x, star.y);
	ellipse(0, 0, 50)
}
🎗 Remember the colon and comma in object notation.
star1 = {
x: 100,
...
}
⚠️ A common pitfall is to forget the object name and period when citing a property, eg
star1 = {
	x: 100,
	y: 150,
}
addStar( star1 ) ;
function addStar( star ) {
	❌ translate( x, y ) ;
	✅ translate( star.x, star.y ) ;
}
Duplicate this sketch and follow the instructions to convert "naked" function parameters into easier-to-read object properties. Save and post the URL to #declutter-garden.
If you've completed Assignment 4 challenge 2, you can leave once you show your instructor or TA your working sketch for that assignment. If you haven't you can leave once you have asked your instructor or TA a question about your sketch. (You do not need to post anything to Slack--just get oral permission to leave.)
-
Save your sketch on your p5js account and post to GitHub, but also post the URL to your Assignment 4 challenge 2 pattern sketch to #x-pattern-sketch so we can review them in class.
Sim game quiz 0:37-3:30
IGN, Cities: Skylines Review 0:00-00:45
Kelsey Impicciche, I Left The Sims Unpaused with FREE LOVE on ALL NIGHT... 17:12 to 17:40
Let's Game It Out, I'm a Chef That Forces Customers to Eat Garbage - Cooking Simulator 2:13-2:57
Markiplier's review of Thief Simulator 1:45 to 3:00
Markiplier's review of Drug Dealer Simulator
Markiplier's review of Gas Station Simulator
Markiplier's review of Lawn Mowing Simulator
Markiplier's review of THE MOST SATISFYING GAME EVER MADE | PowerWash Simulator - Part 1 0:31 to 1:40
For readability, you can group miscellaneous variables as "families."
function addStar(star) {
	...
}
star1 = {
	x: 5,
	y: 20,
	scale: 3,
	numberOfPoints: 6
}
star2 = {
	x: 150,
	y: 200,
	scale: 1.5,
	numberOfPoints: 4
}
addStar(star1);
addStar(star2);
You can also define an "anonymous" object inside your function call parentheses, with these advantages:
addStar(
	{
		x: 5,
		y: 20,
		scale: 3,
		numberOfPoints: 6
	}
);
// This variation in order gives the same result.
addStar(
	{
		scale: 3,
		numberOfPoints: 6
		x: 5,
		y: 20,
	}
);
👎 Without objects, you can't tell what each parameter means, and you have to get the order right.
function addStar(x, y, scale, numberOfPoints) {
...
}
addStar(5, 20, 3, 6); // 🤷♂️
Generic loops
for( let counter = 0; counter < 20; counter++ ) {...} ; // Defining the loop.
Grid demo with just rows, just columns, both separately, and both nested.
Arrays
muffins = [] // Creating a new array.
muffins[ 0 ] // The first item in an array. The 0 is the "offset" from the start of the array.
muffins[ 1 ] // The second item in the array.
muffins[ 2 ] // The third item in the array.
muffins.length // How many muffins are in the array, in this case 3.
Looping through an array
// First set a counter and how many turns the loop will run.
for( let muffinsBaked = 0; muffinsBaked < muffins.length; muffinsBaked++ ) {
	// Inside the loop, this:
	muffins[ muffinsBaked ]
	// is the muffin being baked in the loop at any given moment.
}
// Writing the recipe.
class Muffin { // Defining a class.
	constructor(x, y, hue) { // Identifying the parameters of the class.
		// Inside the class definition, refer to parameters with "this" prefix.
		this.x
		this.y
	}
	mix() {...} // One method of this class.
	bake() {...} // Another method of this class.
} ;
// Making a muffin.
new Muffin(...) ; // Creating an instance of the class.
let isTooFarLeft = (this.x < 0); // The right side in parentheses will be true or false.
let isTooFarRight = (this.x > width); // "width" is the far right edge of the canvas.
if (isTooFarLeft || isTooFarRight) { // "||" means "OR".
 	this.addX = -this.addX; // "addX" is the velocity. Adding "-" reverses the velocity.
}
As individual students, play the 50 objects template sketch to see a bouncing ball simulation with five dots bouncing back and forth. Then fill in the blanks to convert a sketch that builds 5 objects manually into one that builds 50 objects using an array and a for loop. Save your sketch and post the URL to #fifty-objects.
-
Customize the template shared in class to create your own version of the venerable 10 PRINT maze and post it to #x-10print.
As a pair, duplicate the populate sim exercise and change the code inside the show() function for the Breeder and Catcher class to display sprites you've made before (or new ones if you prefer).
⚠️ Make sure to:
One student should post the joint sketch URL to #customize-classes and tag the collaborator.
Use an object to add a lot of new bubbles quickly using an array and a loop.
Save your sketch on your p5js account, and paste the URL and related information into the appropriate file on GitHub as described in the Assignment Submission Guidelines.
//🎗 You can specify an item in an array with
array[ offset ]

// Strangely, offset starts with 0 and goes to one less than the length of the array 🤔.
let pets = [ 🐶, 🐱, 🐦 ] ;
pets[ 0 ] // 🐶.
pets[ 1 ] // 🐱.
pets[ 2 ] // 🐦.
pets.length // 3, not 2!

// You can add a pet to the array by referring to its offset.
pets[ pets.length - 1] = 🐵 ;

// But there's an easier way:
pets.push( 🐵 ) ;

// Either way, you've added an item to the end of the array.
// Now pets is  [ 🐶, 🐱, 🐦, 🐵 ]

// So in a loop, you can write this:
dots[ dots.length - 1 ] = new Dot() ;

// but this is simpler:
dots.push( new Dot() ) ;
// These are examples of global variables that affect every sprite.
x // The horizontal position of the sprite.
addX // The speed of the sprite.
isAlive // Whether the sprite has died.

// These are properties that can be different for each sprite.
this.x // The horizontal position of this particular sprite.
this.addX // The speed of this sprite.
this.isAlive // Whether this individual sprite has died.
Duplicate the Butterfly Swarm exercise. Although a single butterfly bounces off the walls correctly, as soon as you add many with a loop the butterflies fly in lockstep or erratically. Follow the instructions to add the this. prefix to differentiate the behavior of each individual butterfly.
Post your URL to #x-butterfly-swarm.
Save your sketch on your p5js account, and paste the URL and related information into the appropriate file on GitHub as described in the Assignment Submission Guidelines.
-
-
-
Avoid using the same name for your own variables, or a reserved name that P5js already uses like width, draw, or mouseX.
Do use the same variable name for a single thing that changes.
// ✅ It's the same health, but it changes when mom eats a meal.
mom.health = 50 ;
if ( mealIsHealthy ) {
	mom.health++ ; // 👵🥘
} else {
	mom.health-- ; // 👵🥘
}
Don't use the same variable name for different things.
// ❌ This is the same variable name for different things.
let distanceApart = dist(mom.x, mom.y, dad.x, dad.y); // 👵💥👴
if (distanceApart < collisionDistance) {
	mom.health--;
	dad.health--;
}
let distanceApart = dist(mom.x, mom.y, dog.x, dog.y); // 👵💥🐶
if (distanceApart < collisionDistance) {
	mom.health--;
	dog.health--;
}
Do use different variables for different things.
// ✅ Each pair has a different variable for the distance between them.
let distanceApartMomDad = dist(mom.x, mom.y, dad.x, dad.y); // 👵💥👴
if (distanceApartMomDad < collisionDistance) {
	mom.health--;
	dad.health--;
}
let distanceApartMomDog = dist(mom.x, mom.y, dog.x, dog.y); // 👵💥🐶
if (distanceApartMomDog < collisionDistance) {
	mom.health--;
	dog.health--;
}
Or you can make a single function that handles every case,
// ✅ The isTouching function handles every pair,
// using return true or return false to indicate the result.
if ( isTouching(mom, dad) ) {
	mom.health--;
	dog.health--;
}

function isTouching( sprite1, sprite2 ) {
	// This variable is only used inside this function
	// and changes every time it is called.
	let spriteDistance = dist(sprite1.x, sprite1.y, sprite2.x, sprite2.y);
	if (spriteDistance < collisionDistance) {
		return true;
	} else {
		return false;
	}
}
Hues that are bigger than 360 at red.
Negative hues turn white.
In breakout groups, customize the Fade Health Exercise template by replacing the Mom and Dad classes with a sprite from each student.
To indicate health, find a prominent shape or shapes in your sprite whose fill color can change, eg the ellipse corresponding to the body of a frog. The fill for this shape should start out 100% saturated but change with health. To ensure this, make sure the lines immediately before this shape look like the lines already in the template, eg:
let saturationAsPercent = 100 * (this.health) / startHealth;
fill("hsla(240," + saturationAsPercent + "%, 50%, 1)");
// Draw shape here.
fill(`hsla(240, ${saturationAsPercent}%, 50%, 1)`);
⚠️ For the fade to be visible, this fill color must be highly saturated, eg not close to white, gray, or black. You can change the hue (h)from 240 to any number up to 360. However, the second percentage (l) should be relatively close to 50%; otherwise if it's too high (close to white) or too low (close to black) you won't be able to see it desaturate when the sprite loses health.
Fade each sprite's health over time, but replenish any two that collide. Adjust the collision distance or number of sprites to find a balance where they neither die out nor overpopulate. Post the result to #x-replenish-health.
Detect when two "breeder" sprites in your sim game collide and add a new breeder as offspring.
Save your sketch on your p5js account, and paste the URL and related information into the appropriate file on GitHub as described in the Assignment Submission Guidelines.
Post to #troubleshooting
🎗 Edit > Tidy your code before sharing
⚠️ Slack hides messages after 90 days
Play the sketch ten times, counting how many matches and failures you get out of 10. Report to the instructor to calculate the likelihood across the entire class.
⚠️ Adding noLoop() and keeping under 50 will prevent crashing your browser!
parseInt() parses out the integer (drops any decimals)
-
Save your sketch on your p5js account, and paste the URL and related information into the appropriate file on GitHub as described in the Assignment Submission Guidelines.
-
Use the splice() method to remove sprites from the screen, along with the advantages of looping backwards.
Detect when a catcher/predator in your sim game collides with a breeder/prey and remove the breeder.
Save your sketches on your p5js account and submit via GitHub.
Not graded. See #reference channel.
// Parameters are minimum, maximum, default, and step (0 = continuous).
bunnySlider = createSlider(1, 20, 3, 0);
numberOfBunnies = bunnySlider.value();
// A while loop is an alternative to a for loop when you don't know how many times you need to loop.
while ( condition ) {
	// Do something.
}
bubbles.push() adds an item to the end of an array, and bubbles.pop() removes the last item from an array.
You can combine them with a while loop to add items to an array until you reach a certain number of items, or to remove items until you get down to that number.
//Draw bubbles to match a target count like 12 or 200.
while (bubbles.length < targetCount) {
	bubbles.push(
		new Bubble(random(width), random(height), radius)
	);
}
// Remove existing bubbles if there are too many.
while (bubbles.length > targetCount) {
	bubbles.pop();
}
⚠️ Make sure to limit the while condition so you don't get stuck in an infinite loop!
In pairs, complete the Bubbles Slider exercise to practice using sliders and while loops to control the number of sprites on the screen.
Consecutive numbers: Count off consecutively from zero to the last student. Say you have 15 students; the first will be #0 and the last will be #14. Write down your number so you don't forget it.
Cyclic numbers: Now do a second count also from zero, but this time to create 5 teams. But because we're starting with zero, there will be a Team 0. So you will count off 0, 1, 2, 3, 4, 0, 1, 2, ... instead of 1, 2, 3, 4, 5, 1, 2, ...
As a team, convert each student's consecutive number below to her cyclic number:
Can you figure out a general rule for making these conversions?
🎗 To allow each sprite to act independently, convert them from functions to classes:
Complete the instructions in this exercise to create a simple animation that takes advantage of the draw() loop and the remainder % operator. Post your final version to #flap-wings.
-
In breakout groups, brainstorm a list of conditions and situations that make you feel more and less confident about coding. Add these to a classwide document shared by your instructor. Choose someone from your group to explain them.
👨🏫 How to prompt AI: code part 1 (generating and debugging)
👨🏫 How to prompt AI: code part 2 (incremental prompts)
💡 This sample prompt follows the role output level context goal template:
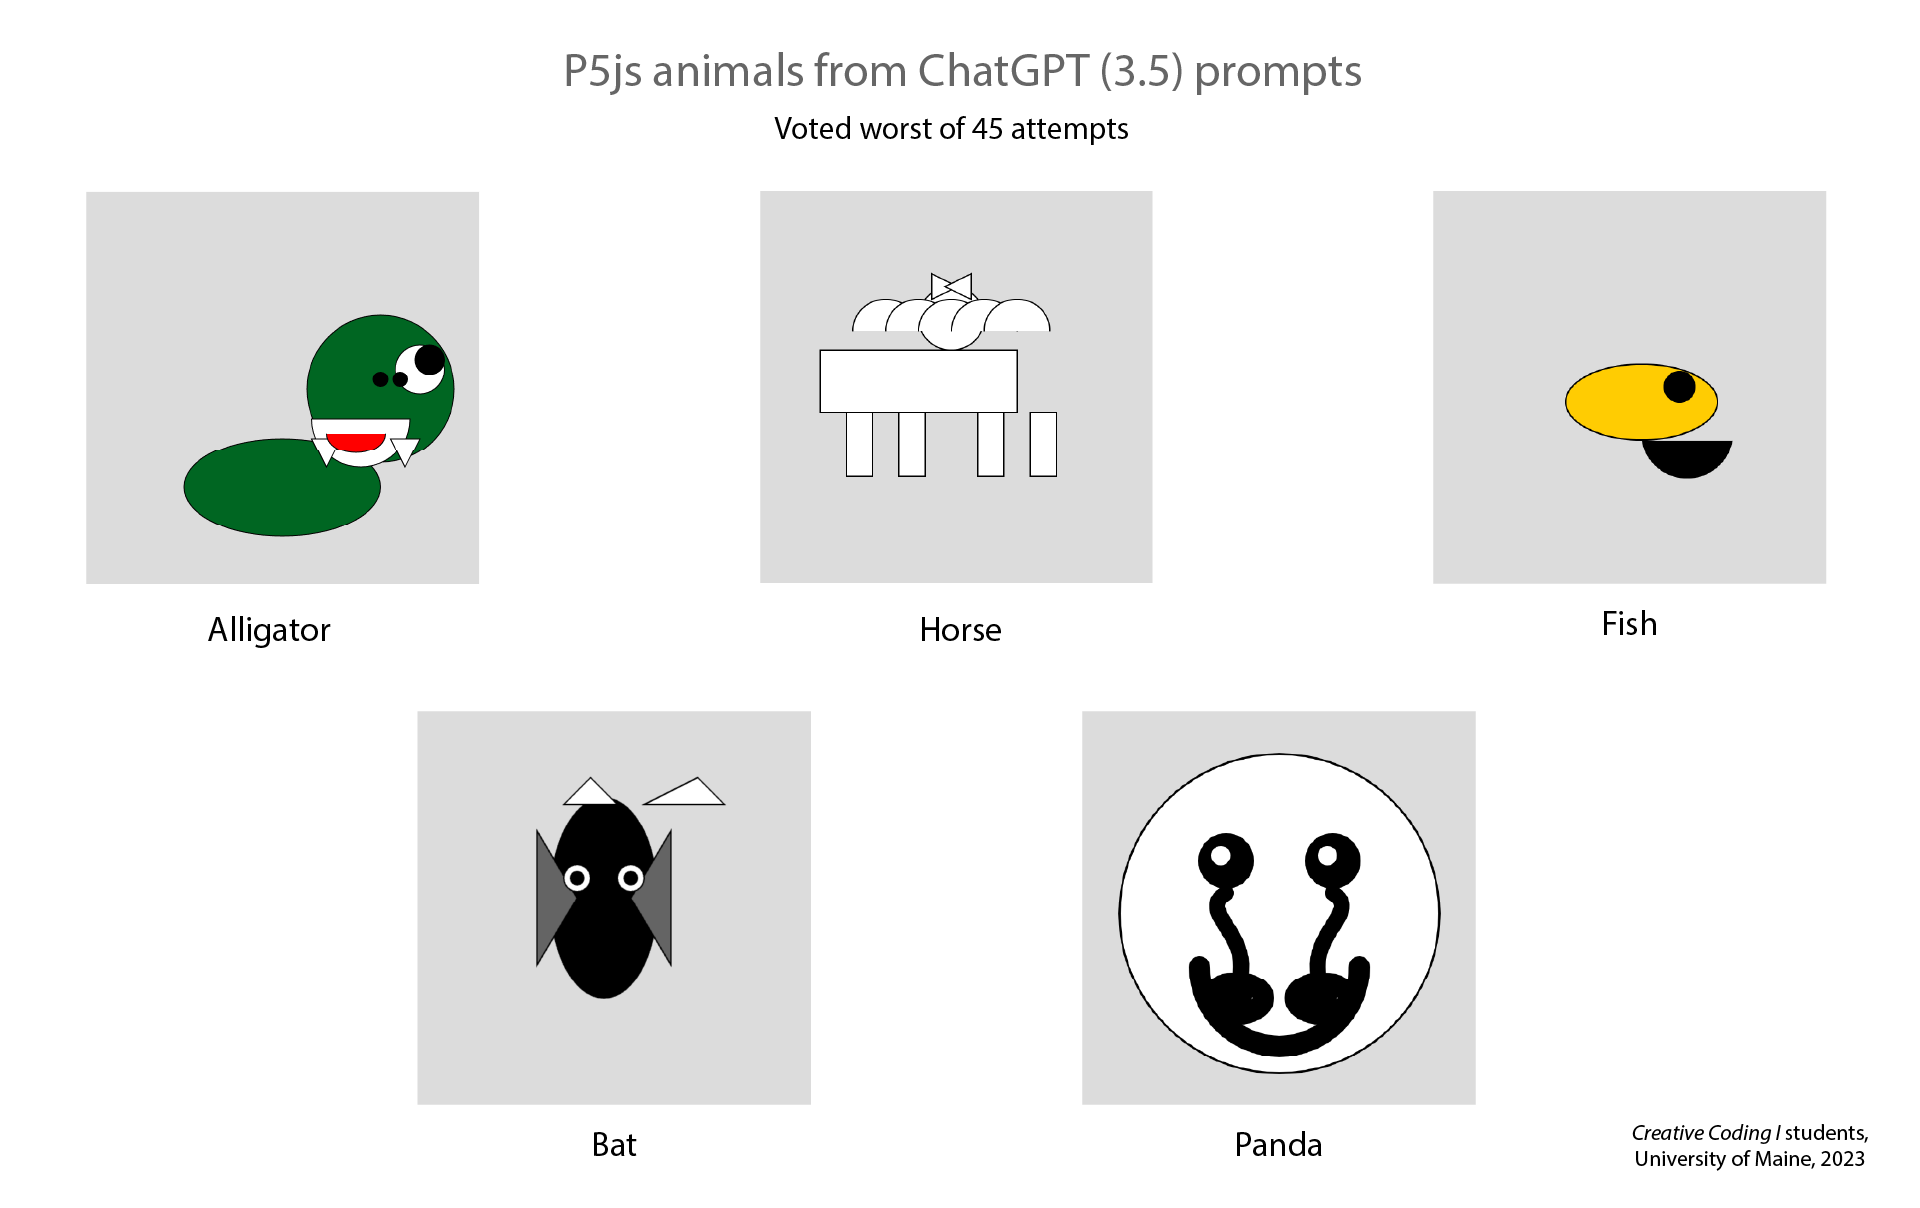
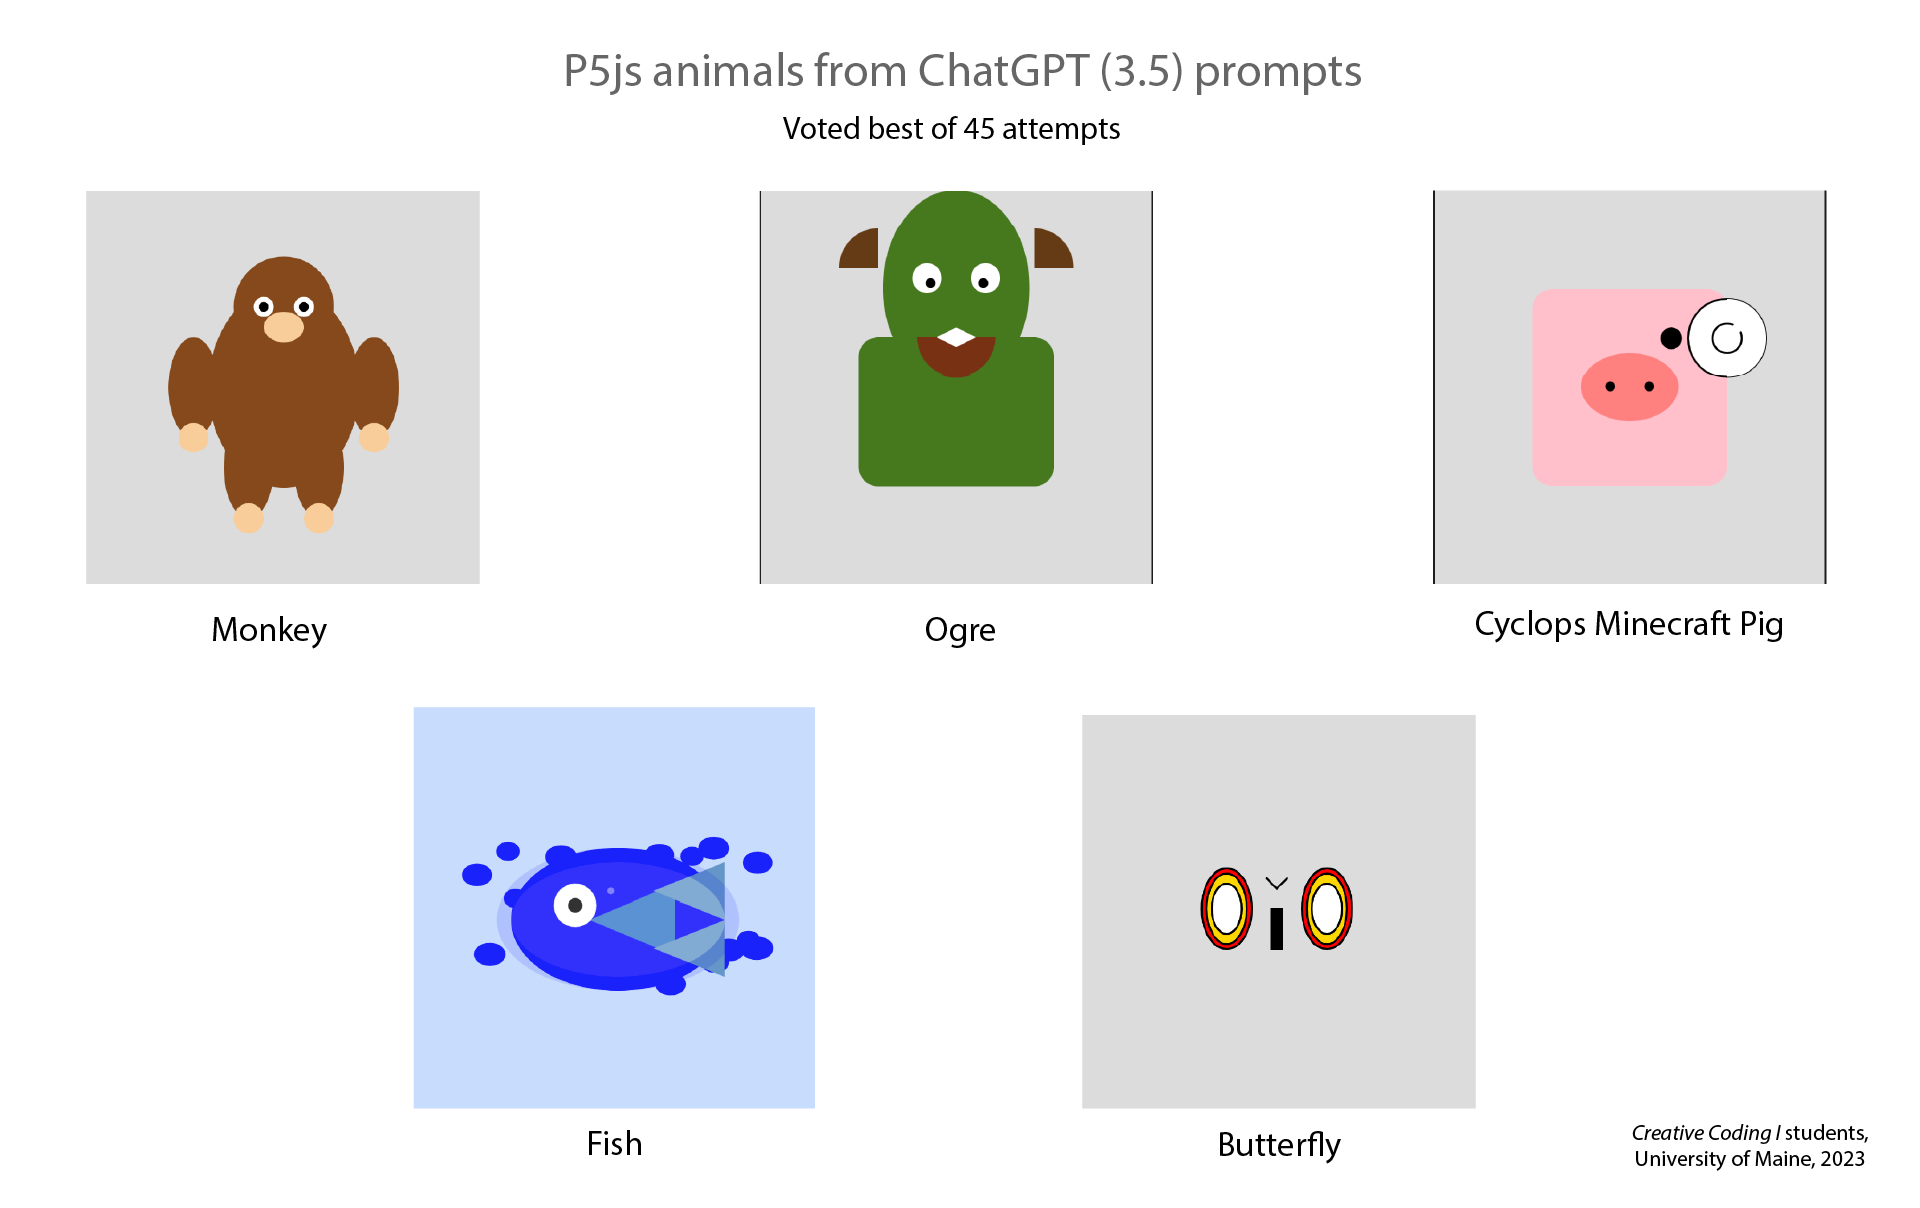
Ask a generative AI chatbot like ChatGPT to code a P5.js image based on your description of a sprite made from simple shapes. Use the online P5.js editor to test code that ChatGPT gives you back. Once you have a start, request small incremental changes to the image, refining the prompt if it’s interpreted poorly or if the result is not what you expected.
Post a screenshot (not URL) of the result #ai-sprite, then add a 👍 emoji to the three best from your class and a 💩 emoji to the three worst. Discuss the difference between hand-coded and AI-generated sprites with the class.
Sprites voted worst from past classes
Sprites voted best from past classes
🎟 Check in with your TA about your Assignment and Lab status, who will give you credit for class participation.
-
-
A general overview of NFT promises and perils.
How to mint variable P5js art using the Art Blocks platform.
An argument that NFTs are better for artists than "web2" creator platforms like Patreon.
After watching the NFT webinar in the reading, do additional research to decide whether you think NFTs are a net benefit or detriment to society, and be prepared to argue your point in class. If you can't make up your mind, then bring to class at least one specific technical, artistic, or ethical question you have about them (eg, "What is minting?", "Why can't people just download NFTs like JPEGs?", or "Why do so many artists use P5js to make NFTs?").
While you don't need to post them in advance, you must come to class prepared with either 1) an argument for, 2) an argument against, or 3) a specific question about NFTs.
See #reference channel.
Students who brought questions raise them in class; their peers and instructors will try to answer them.
The class divides into breakout groups based on their opinions on NFTs, and prepares an argument pro or con to present to the rest of the class.
-
-
All students attend lecture to show their final projects.
-
-
Required for all students whose cumulative grade by the previous class is at a B- or below.
-
-
Required for all students whose cumulative grade by the previous class is at a B- or below.